动态与程序化材质
接下来我们将材质和蓝图结合,创建一些综合的视觉系统,这部分内容要求对C++开发比较熟悉,可以初步了解材质在更大系统中的位置
天空系统
在这个例子当中,我们尝试创建一个自定义的环境光照系统,使用UE5提供的环境光组件用于白天的照明,并在夜晚切换为动态的星象球。涉及到动态材质实例(Dynamic Material Instance)和 蓝图函数库 (Blueprint Function Library) 等内容
环境光照
UE5中有很多种方式创建天空光,很多教程可能会提及引擎自带内容中的BP_Sky_Sphere,这是UE4时代的经典方法,但不推荐在新的项目中使用了,因为其对于体积云和大气的模拟使用的是老方法,而且想要添加自定义的效果也比较麻烦。这里提供一种思路,即使用新的环境光照系统+自制材质定义天空视觉效果的搭配,既可以直接享受UE5提供的体积云和散射等效果,又可以加入自己的HDRI贴图或者其他效果
UE5提供的环境光照组件包括:
- Directional Light (定向光源): 模拟太阳或月亮,提供主光源和阴影。
- Sky Atmosphere (天空大气): 一个基于物理的程序化天空渲染组件,能模拟瑞利散射和米氏散射,创造出逼真的大气效果,从地面到太空都能无缝过渡。
- Sky Light (天空光): 捕捉天空(来自Sky Atmosphere、HDRI或场景中的任何物体)的光照和颜色,并将其作为环境光(Ambient Light)和反射应用到整个场景中,填充阴影区域。
- Volumetric Clouds (体积云): 基于物理的程序化云系统,可以创建动态、逼真的云层。
- Exponential Height Fog (指数高度雾): 模拟雾效,帮助场景更好地融入远方的天空和大气。
可以单独创建,或 窗口 (Window) -> **环境光照混合器 (Environment Light Mixer) **统一创建并调整,注意这里的Sky Light是核心组件,单独只添加一个Sky Light会提示至少存在一个定向光源或天空大气或标记为天空的物体才能捕捉光照
昼夜交替
首先,创建一个用于天空球的材质M_Sky,选择Blend Mode为Additive,这样在黑夜时能自然的过度为星空,选择Shading Model为Unlit,因为天空盒并不需要被光照,并勾选Two Sided以在球体内部可见,然后简单连接为下面的样子:
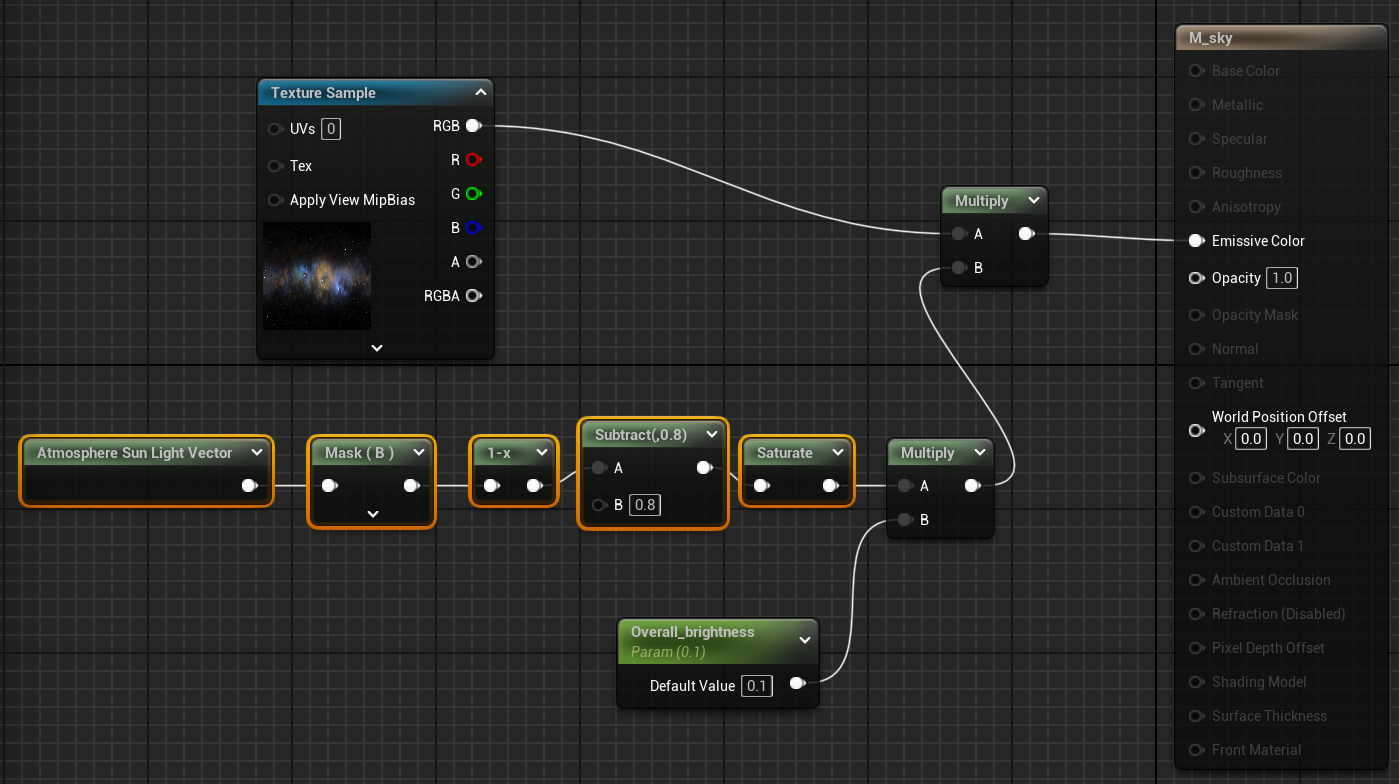
很简单,基本上是根据太阳(Directional Light)的位置,当Z轴值为负数(晚上),增大天空盒亮度
接着,创建一个蓝图类BP_Sky,并继承自Actor,在组件栏,添加几个组件:
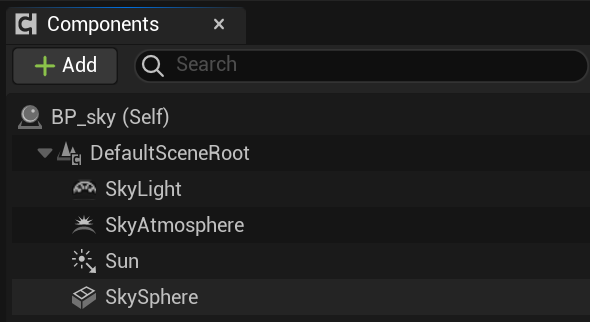
其中"Sun"即Directional Light,将其Mobility设置为Movable,而"SkySphere"是Static Mesh,将其指定为球体,然后设置一个很大的Scale例如10000,将Cast Shadow关闭,设置其材质为上面创建的天空球材质
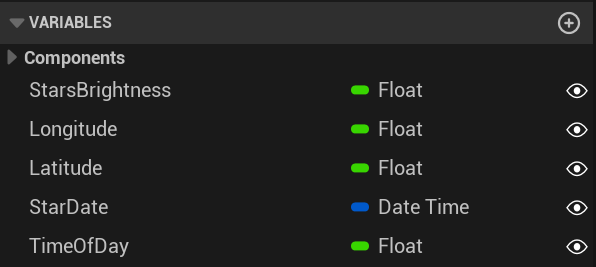
添加几个变量:
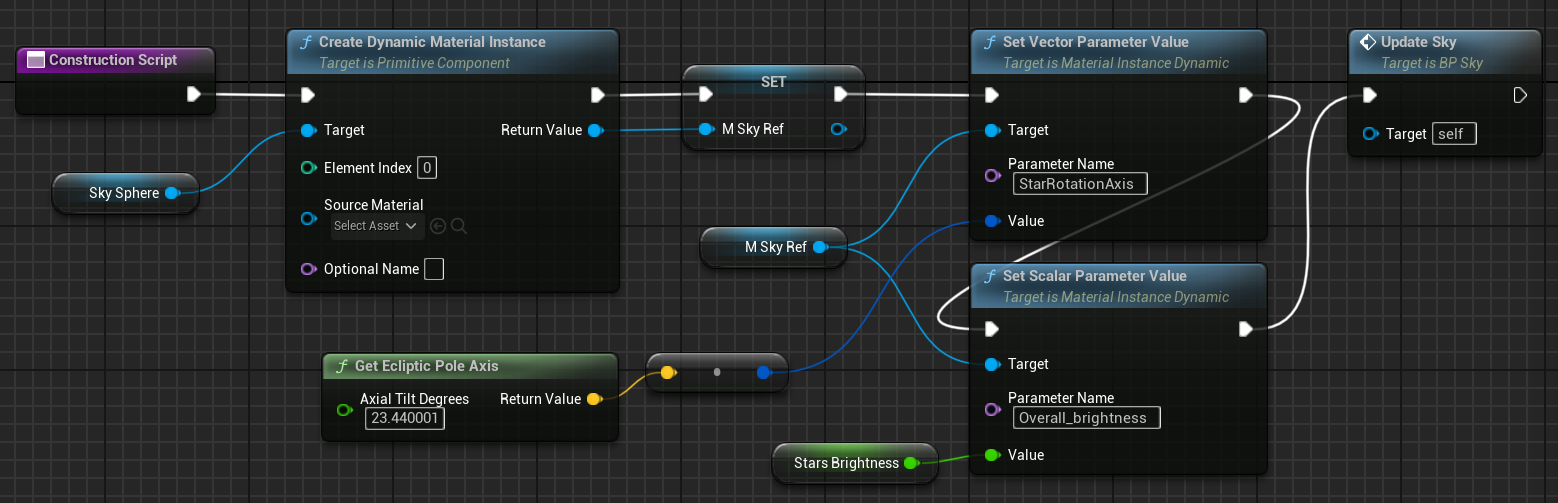
首先我们让白天黑夜能够通过TimeOfDay切换,还是在My Blueprint面板中,点击Functions旁边的 + 号,创建一个新函数,命名为 UpdateSky,简单连接:
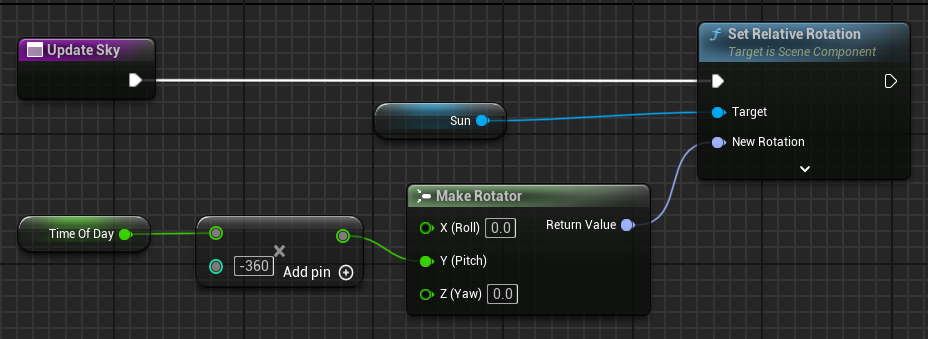
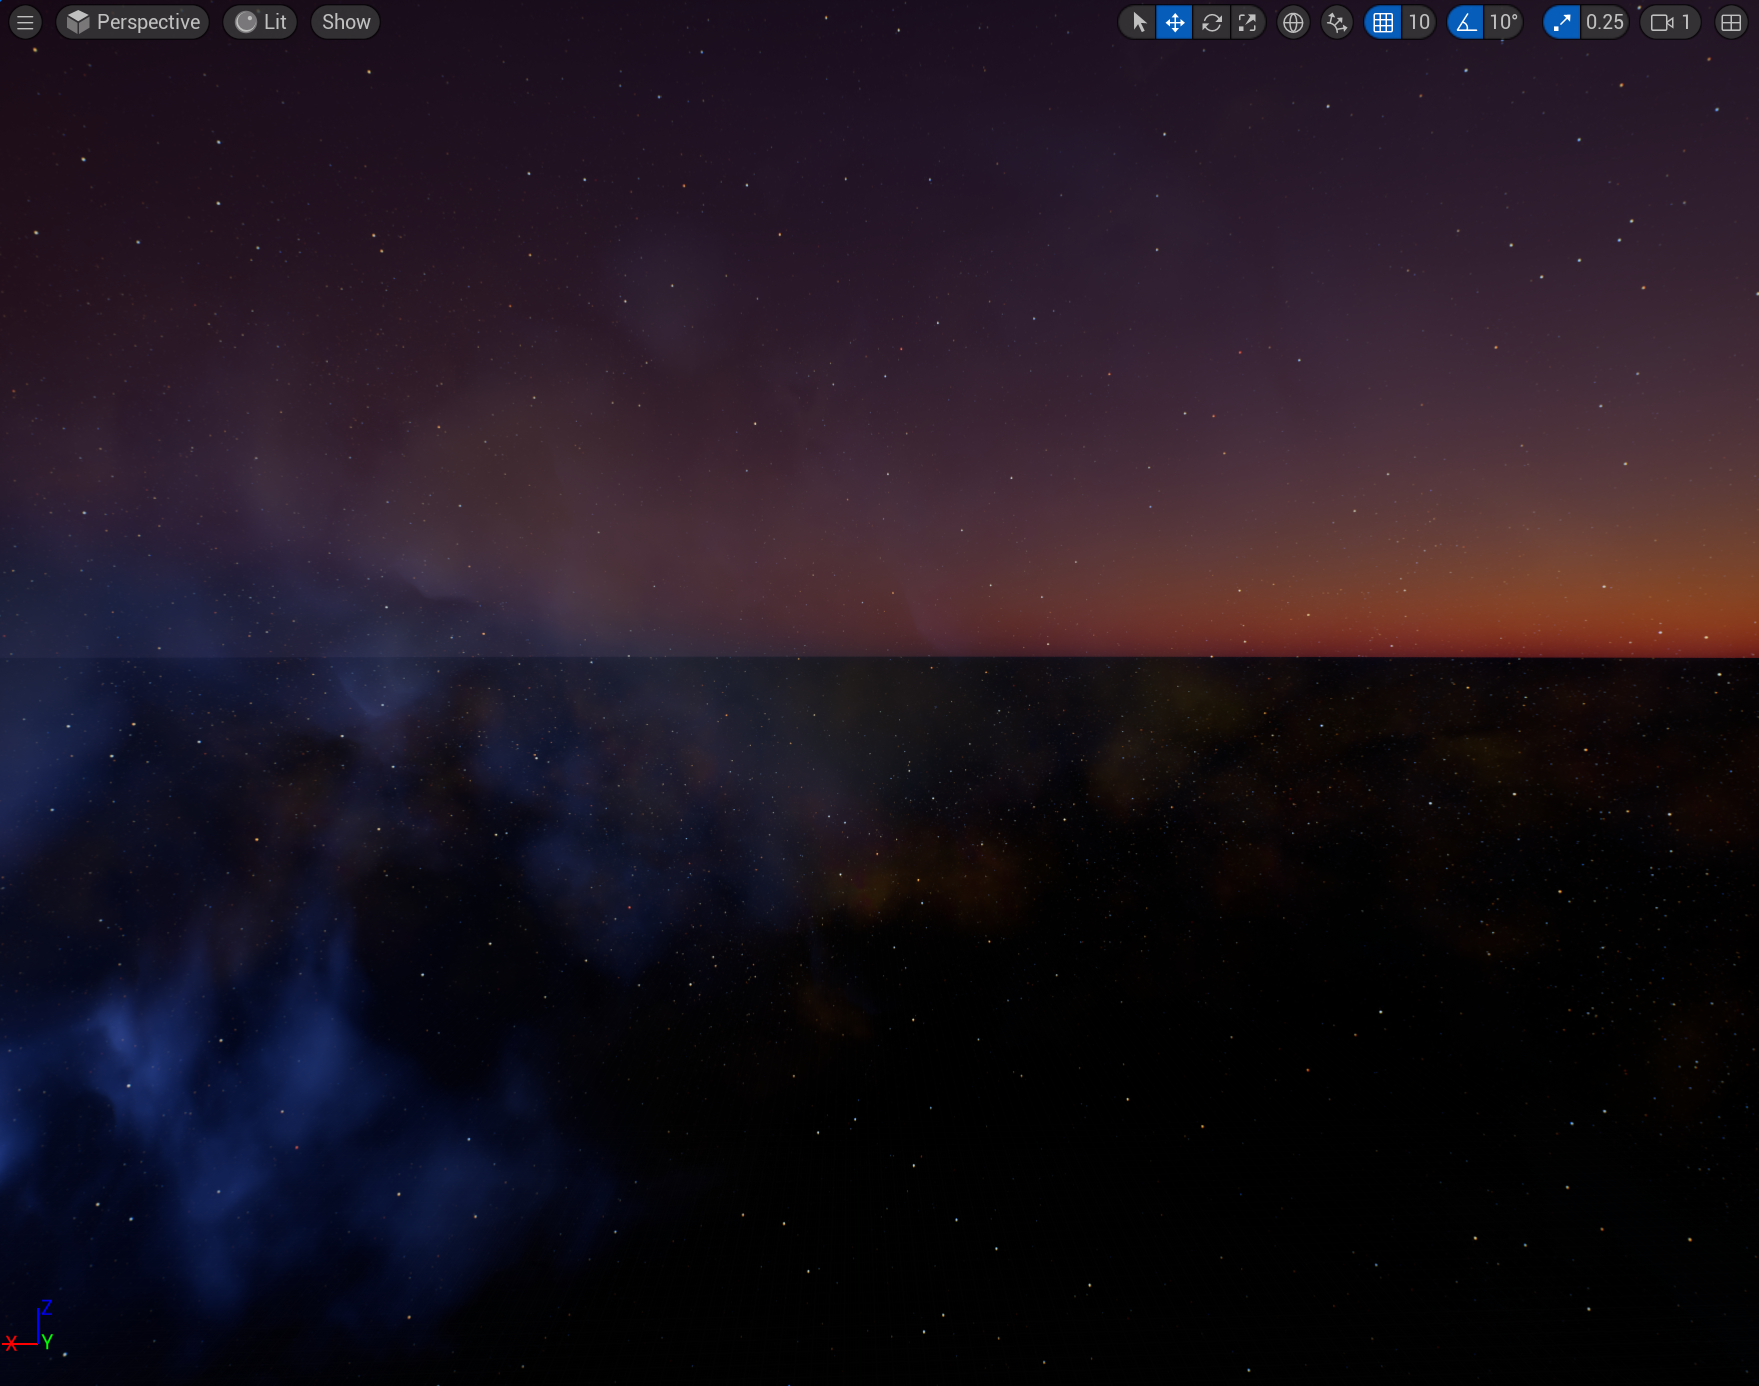
其中"Sun"和"Time Of Day"是上面已经添加的变量,可以直接拖入节点图中。随后,在Construction Script中,拖入UpdateSky并连接,这样只要在编辑器中修改了变量,就会触发构造并显示在视图当中。添加蓝图BP_Sky到关卡,修改Time Of Day可以看到当黄昏时,星空背景慢慢显现:
星空旋转
接下来,尝试为星空添加合理的旋转,这里,其实可以直接在蓝图中旋转"SkySphere",但我选择了复杂一些的做法,在材质中旋转贴图,主要是为了展示如何使用动态材质实例(Dynamic Material Instance)
首先修改材质M_Sky,我们的需求是,球上的贴图能绕某个空间中的轴(StarRotationAxis)旋转一定角度(StarRotationAngle),没有自带的节点能够做到这一点,但由于球体的默认UV为等距柱状投影,所以可以手动计算。我们拿到天空球表面点的坐标,使用罗德里格旋转公式后,手动计算等距柱状投影后的UV:
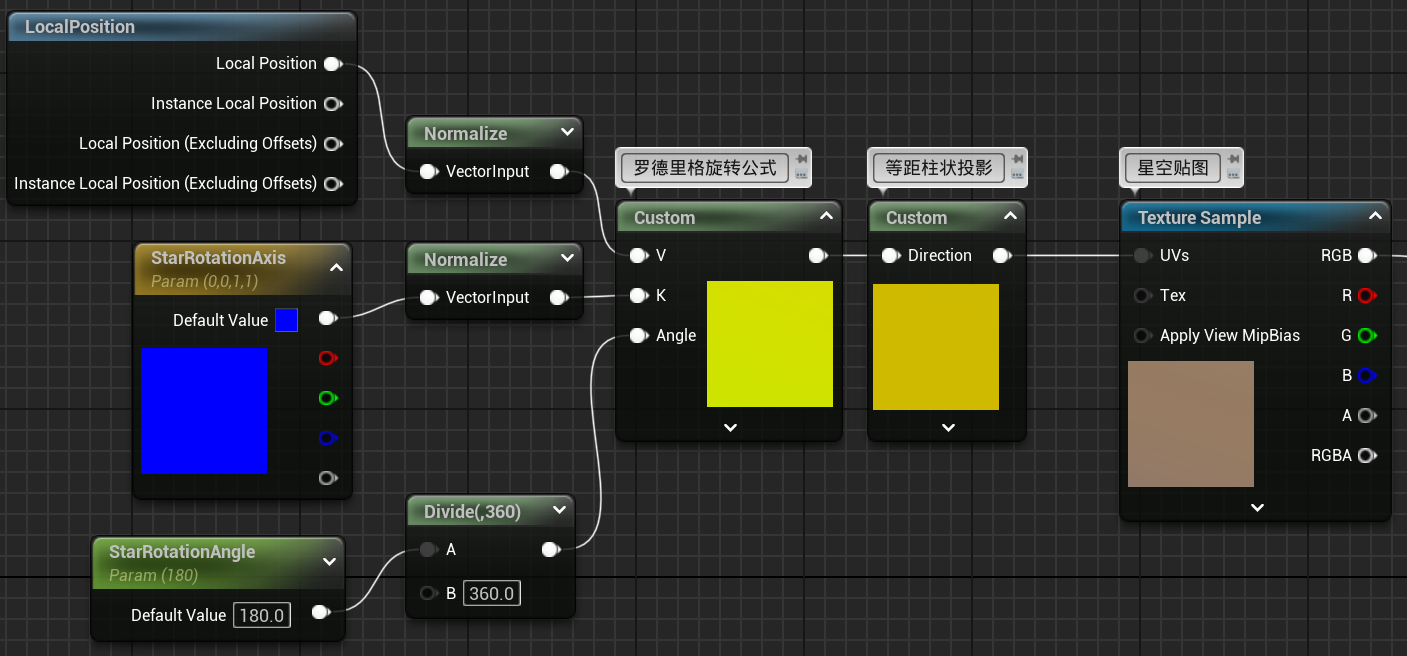
其中的两个custom节点依次为:
// 输入:
// V:需要旋转的向量
// K:旋转轴
// Angle:旋转角

// 罗德里格旋转公式
float cosAngle = cos(Angle);
float sinAngle = sin(Angle);
float3 v_rot = V * cosAngle + cross(K, V) * sinAngle + K * dot(K, V) * (1 - cosAngle);

// 输出:
// 旋转后的向量
return v_rot;
// 输入:
// Direction: 球体上一点
float3 Dir = normalize(Direction);
// 常数
const float InvPi = 0.31830988618;
const float Inv2Pi = 0.15915494309;
// 计算U坐标(经度),范围[0, 1]
// atan2(y, x)输出[-PI, PI],将其映射到[0, 1]
float U = atan2(Dir.y, Dir.x) * Inv2Pi + 0.5;
// 计算V坐标(纬度),范围[0, 1]
// asin(z)输出[-PI/2, PI/2],将其映射到[0, 1]
// 注意:这里使用 0.5 - ... 是为了让V坐标正确,
// 使得天空的顶部(Z=1)对应V=0,底部(Z=-1)对应V=1
float V = 0.5 - asin(Dir.z) * InvPi;
// 输出:
// 投影后的UV
return float2(U, V);然后就是比较重要的一步,想要在蓝图中动态修改材质参数,需要创建动态材质实例,在蓝图的构造函数中(操作提示:右键节点的Return Value,点击Promote to Variable,将其提升为蓝图的变量):
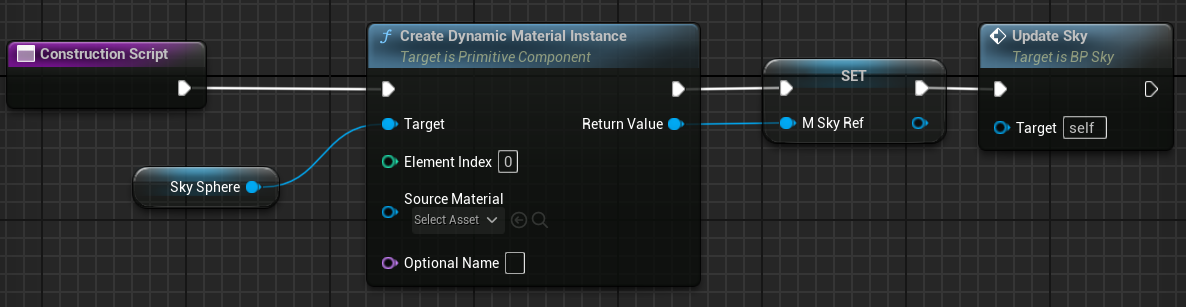
这是实践中的标准方法,Create Dynamic Material Instance 是一个有消耗的操作。避免在 Tick 事件(每帧调用)中创建它。最佳实践就是在 BeginPlay 或其他一次性事件中创建并保存引用(例如在这里的构造函数)。随后就可以在蓝图中使用"Set Scalar Parameter Value"或者"Set Vector Parameter Value"修改材质的参数了,一定要确保修改的参数的名字和材质编辑器中的参数名一字不差,包括大小写。这里可以简单的随便选个旋转轴,并使用游戏时间旋转天空球,具体操作就省略了
如果你感兴趣,可以阅读后面一节,看看如何确定M_Sky的两个参数,即天空球的旋转轴和旋转角度,并更科学的驱动太阳位置,这部分内容略微超过材质系统的范畴了,选择观看即可
星象和太阳位置
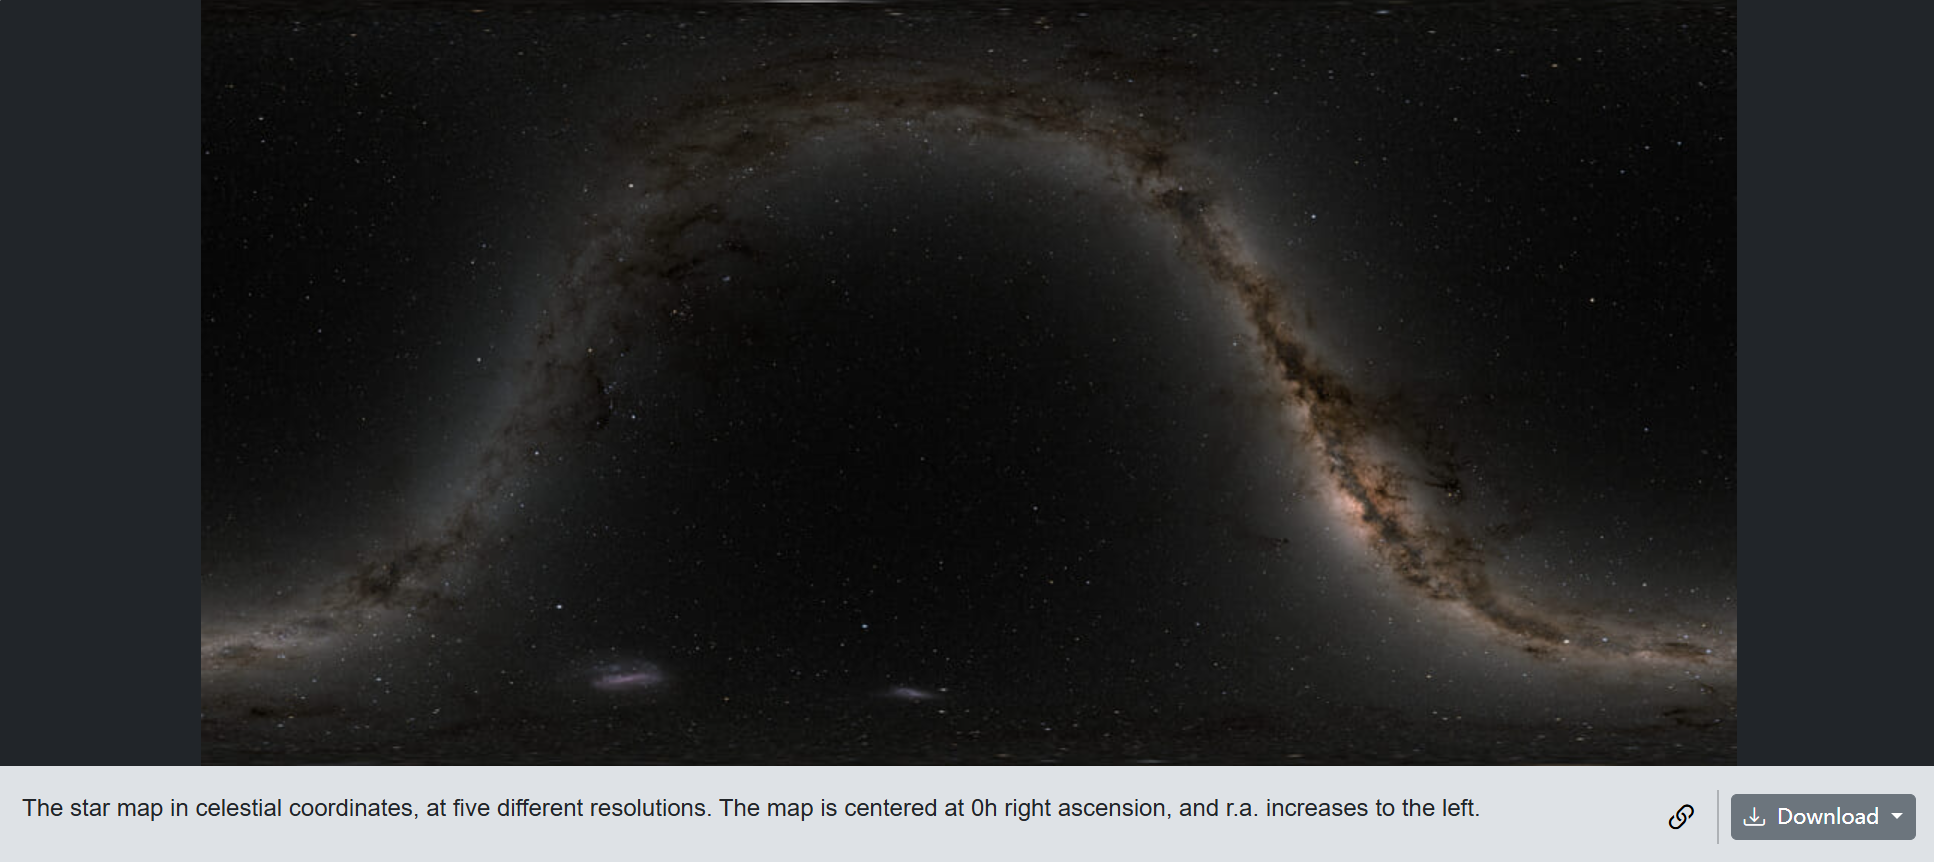
为了模拟地球夜空,选用一张真实夜空的贴图,可以在nasa的网站下载:https://svs.gsfc.nasa.gov/4851/,选择这张celestial coordinates (天球坐标系),并注意其提到了 "r.a. increases to the left" (赤经向左增加),这意味着可能需要翻转纹理的U坐标。推荐至少下载8K或以上版本
这部分的逻辑略微有些复杂,如果在蓝图中用节点创建这些工具函数会比较头疼,这时可以考虑创建蓝图函数库 (Blueprint Function Library) 来编写复杂逻辑,在编辑器中,点击工具 -> 新建C++类,选择Blueprint Function Library作为父类,命名为AstroBlueprintFunctionLibrary,这会创建两个文件AstroBlueprintFunctionLibrary.h和AstroBlueprintFunctionLibrary.cpp,具体的代码如下:
点击跳转或手动查看:代码附录
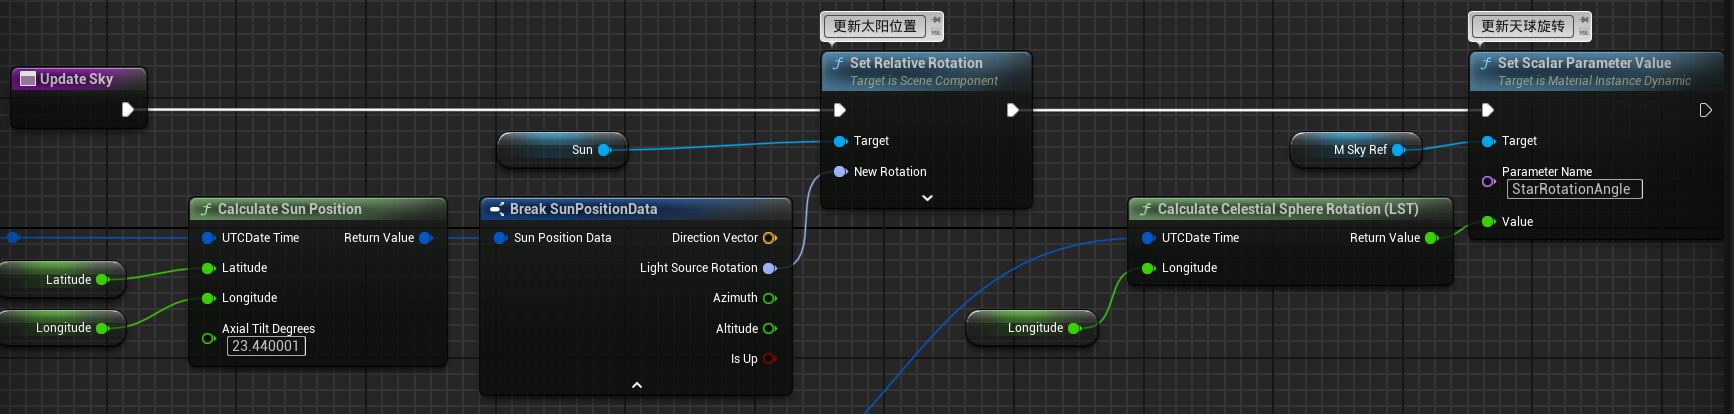
有了这几个工具函数,剩下的就很简单了,首先在BP_Sky的构造函数中,由于黄赤交角为固定值(地球为约23.44度),计算出天球的旋转轴,并修改对应的材质参数
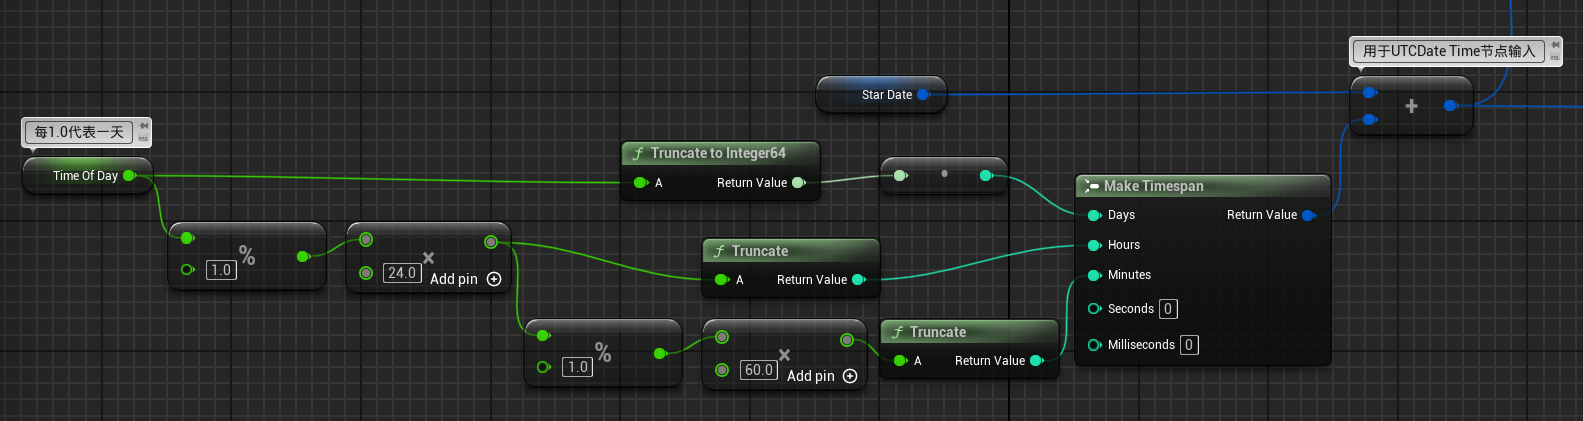
随后修改蓝图函数Update Sky,先将每天的时间和星象日期相加(DateTime结构体本身可以设置每天的时间,不过比较麻烦,还是用TimeOfDay变量来修改每日时间):
然后使用工具函数计算并更新太阳位置和天球旋转:
到这里就基本搞定了,可以在关卡中调整BP_Sky的参数,拖动TimeOfDay查看效果,我只检查了一些基本效果,例如冬季太阳位置会较低,落日较早等,由于是动态效果,这里就不贴效果图了。其实星空贴图应该需要调整一下起始偏移,以及其纹理坐标U反向的翻转问题,但因为对星象不是特别了解,所以就留给懂行的和想继续深入的人了
水体系统
这个例子比较复杂,建议下载对照观看:
接下来的例子,尝试创建一个动态的水体系统,包括四大部分:水面材质,水下后处理材质,近岸浪花,船体交互。涉及到 子系统(Subsystem),材质参数集(MPC),自定义模板等等内容
这个系统相较于上面的天空系统会复杂很多,我们先简单拆解每一个部分。首先是水面材质,通常使用单层水着色模型,拆解一下就是:
- 水面用一个平面来表示,并赋予水面材质,混合模式为透明,默认光照
- 符合菲涅尔定律的反射效果
- 根据水底深浅决定强度的染色效果
- 使用贴图或程序计算的水面顶点偏移(模拟波)
- 模拟水下物体的折射
- 焦散
其次是水下的后处理材质:
- 某种触发机制(盒体碰撞事件或者自定义模板值作为遮罩)
- 根据像素与摄像机的距离决定的雾效
- 水面和空气交界处的分界线
- 焦散
近岸浪花:
- 泡沫材质
- 基于距离场添加岸边泡沫
- 波峰陡峭度值添加泡沫
船体交互:
- 根据模拟波为物体施加浮力
- 更多效果
一般来讲,处于对性能的考虑,水面顶点偏移(模拟波)最好是直接全部用噪声贴图来模拟,但这篇教程主要是为了视觉效果,就尝试使用更加真实的Gerstner波。最后,考虑一些架构设计的核心问题,例如:水面顶点偏移、水下焦散、波峰泡沫、浮力计算,非常多效果都需要同一个源头的波浪信息。我的选择是创建一个单一的“波浪模拟数据源” UWaterWorldSubsystem,然后将数据分发给需要它的系统(GPU渲染端和CPU物理端):
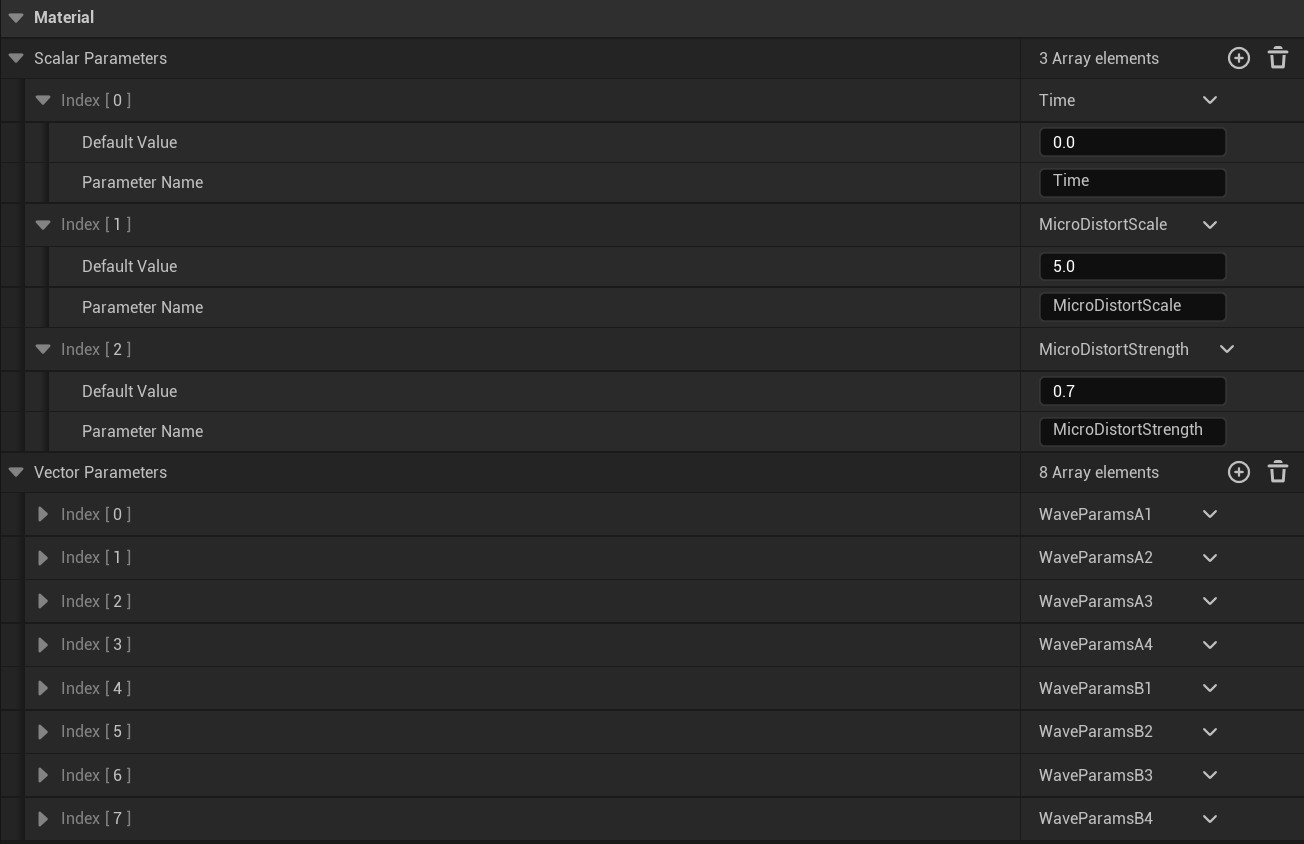
- GPU通道 (渲染): 对于所有材质(水面、水下焦散),最佳选择是 RenderTarget (RT),将水面的World Position Offset计算到一张贴图中,然后在材质中采样,可以避免重复计算,但对于目前这个例子来说有些没必要,下一章会重点讲解。这里就先简单用 UMaterialParameterCollection (MPC),UWaterWorldSubsystem会在每一帧更新这个MPC,将波浪参数(如时间、风向、波长、振幅等)推送到GPU,然后重复用相同的算法计算波。所有相关的材质都从这个MPC中读取数据,保证了视觉上的同步
- CPU通道 (物理与逻辑): 对于船体交互、甚至是一些程序化效果(如浪花粒子生成),需要CPU能直接查询任意位置的波浪高度和法线。为此,我们在 UWaterWorldSubsystem 中提供一个可蓝图调用的C++函数,如
GerstnerWaveDisplacementAndNormal(const FVector& InLocation, FVector& OutDisplacement,FVector& OutNormal)
核心组件
首先创建一个管理波浪计算逻辑的类,如上面所说,创建一个 UWaterWorldSubsystem C++类,继承自 UWorldSubsystem,这是一个类似单例的类,引擎会在创建世界时一同创建其实例,但 UWorldSubsystem 类旨在承载一些核心逻辑,所以不允许蓝图化,在使用时的一个范式是同步创建一个 Data Asset 用于分离重要参数的设置。我们首先来处理这个,创建一个 WaterSettings 类,继承自Data Asset,这里定义了单个波的参数结构体,包括波长、振幅、尖锐程度和方向,然后UWaterSettings类成员包括MPC的指针,以及包含多个波的列表:
// WaterSettings.h
#pragma once

#include "CoreMinimal.h"
#include "Engine/DataAsset.h"
#include "WaterSettings.generated.h"

// 单个波的结构体定义
USTRUCT(BlueprintType)
struct FGerstnerWave
{
	GENERATED_BODY()

	UPROPERTY(EditAnywhere, BlueprintReadWrite, Category="Wave")
	float Wavelength = 1000.f;

	UPROPERTY(EditAnywhere, BlueprintReadWrite, Category="Wave")
	float Amplitude = 20.f;

	UPROPERTY(EditAnywhere, BlueprintReadWrite, Category="Wave", meta=(ClampMin = "0.0", ClampMax = "1.0"))
	float Steepness = 0.8f;

	UPROPERTY(EditAnywhere, BlueprintReadWrite, Category="Wave")
	FVector2D Direction = FVector2D(1.0f, 0.0f);
};

/**
 * 数据资产:关于水体的参数配置
 */
UCLASS()
class EXMATERIAL_API UWaterSettings : public UDataAsset
{
	GENERATED_BODY()

public:
	// MPC
	UPROPERTY(EditAnywhere, BlueprintReadOnly, Category="Config")
	TObjectPtr<class UMaterialParameterCollection> WaterMPC;

	// Gerstner波可以叠加,保存一个波的数组
	UPROPERTY(EditAnywhere, BlueprintReadOnly, Category="Waves")
	TArray<FGerstnerWave> WaveParameters;

	// 最大可叠加波的数量
	UPROPERTY(EditAnywhere, BlueprintReadOnly, Category="Config", meta=(ClampMin="1"))
	int32 MaxWavesInMPC = 4;
};// WaterSettings.cpp
// WaterSettings.cpp 没有额外的内容,包含头文件即可
#include "WaterSettings.h"随后为了将 WaterSettings 这个数据资产分配给后续的 UWaterWorldSubsystem,需要在项目设置中额外添加这个设置,创建一个类UWaterSystemProjectSettings 继承自 UDeveloperSettings:
// WaterSystemProjectSettings.h
#pragma once

#include "CoreMinimal.h"
// 需要在项目设置中设置子系统使用的数据资产
#include "Engine/DeveloperSettings.h"
#include "WaterSystemProjectSettings.generated.h"

UCLASS(Config = Game, DefaultConfig, meta = (DisplayName = "Water System Settings"))
class UWaterSystemProjectSettings : public UDeveloperSettings
{
	GENERATED_BODY()
public:
	// 默认设置,可跳过
	// !! 注意:请将 "ExMaterial" 替换成你的项目实际名称
	UPROPERTY(Config, EditAnywhere, BlueprintReadOnly, Category = "Water", meta = (AllowedClasses = "/Script/ExMaterial.WaterSettings"))
	FSoftObjectPath DefaultWaterSettings;
};// WaterSystemProjectSettings.cpp
// WaterSystemProjectSettings.cpp 没有额外的内容,包含头文件即可
#include "WaterSystemProjectSettings.h"然后修改项目的配置文件 (ProjectName.Build.cs):
		// ...
		// 修改这一行,在最后添加 "DeveloperSettings"
		PublicDependencyModuleNames.AddRange(new string[] { "Core", "CoreUObject", "Engine", "InputCore", "EnhancedInput" , "DeveloperSettings"});
		// ...
最后就是核心的 UWaterWorldSubsystem,基础功能包括推送数据到MPC,计算Gerstner波等,注释的很详细,就不赘述了:点击跳转或手动查看:代码附录
水面材质
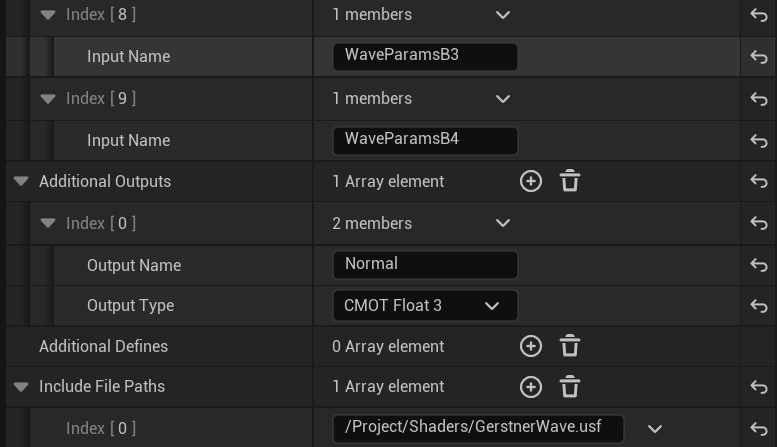
先处理和波浪模拟相关的内容,新建一个材质函数 MF_GerstnerWave,调整输入输出如下图,其中的WaveParams为打包的波浪参数(最多支持4个波叠加),因为我们想使用MPC从cpu端同步这些参数到多个材质,而MPC只支持长度最大为4向量,描述一个波需要5个参数,因此需要分开打包参数,具体打包规则见中间的Custom节点的代码:点击跳转或手动查看:代码附录
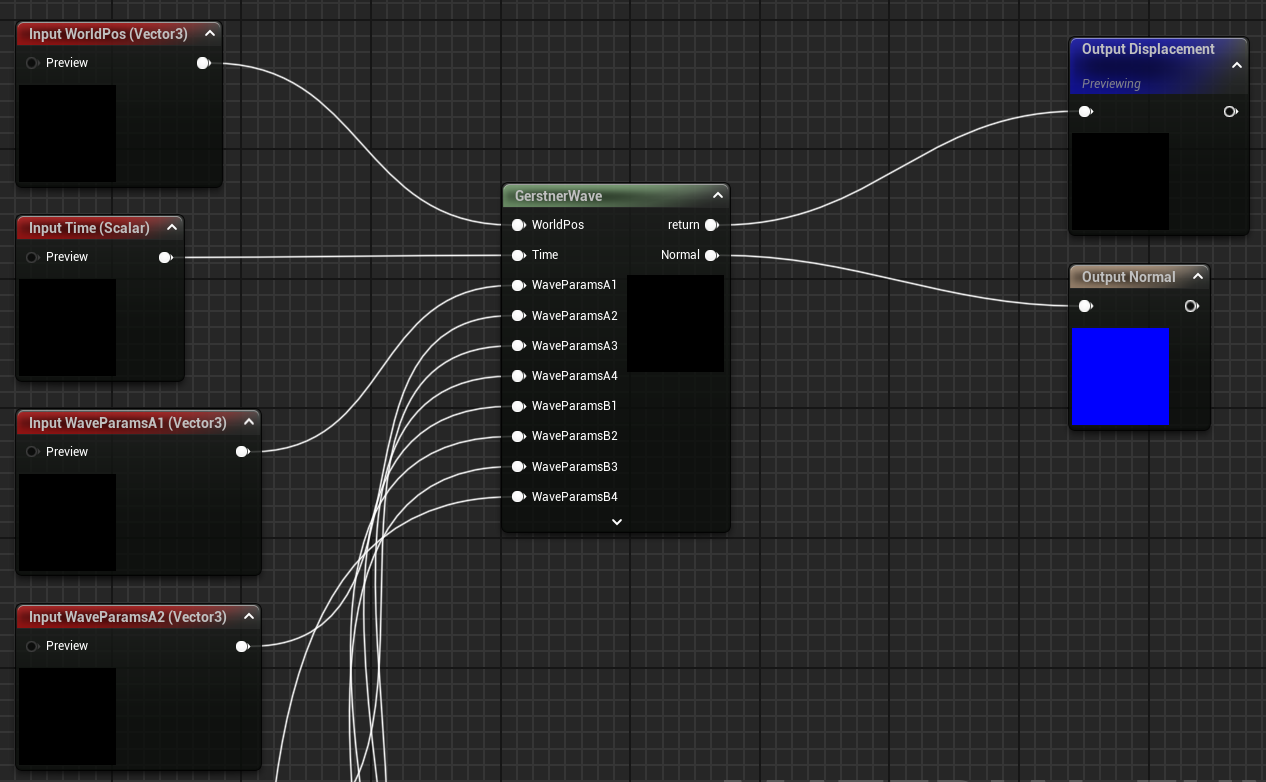
注意到此Custom节点使用了一些自定义的函数,这些函数与上面UWaterWorldSubsystem中计算波的函数完全一致,因此可以保证相同的视角效果。此外,在Custom节点中是无法定义函数的,因此这里是额外包含了着色器文件(注意下图中的Include File Paths),如何这样做以及具体的代码,请查看附录:在Custom节点包含usf文件
随后创建一个 MPC_Water,它是一个独立的资源 (Asset),你可以在里面定义一组参数(例如颜色、数值、向量等)。然后,任何材质(无论这个材质用在哪个物体上)都可以读取这些参数。最关键的是,你可以在运行时通过蓝图或C++一次性修改 MPC 中的参数值,这个改动会立即应用到所有正在使用该MPC的材质上:
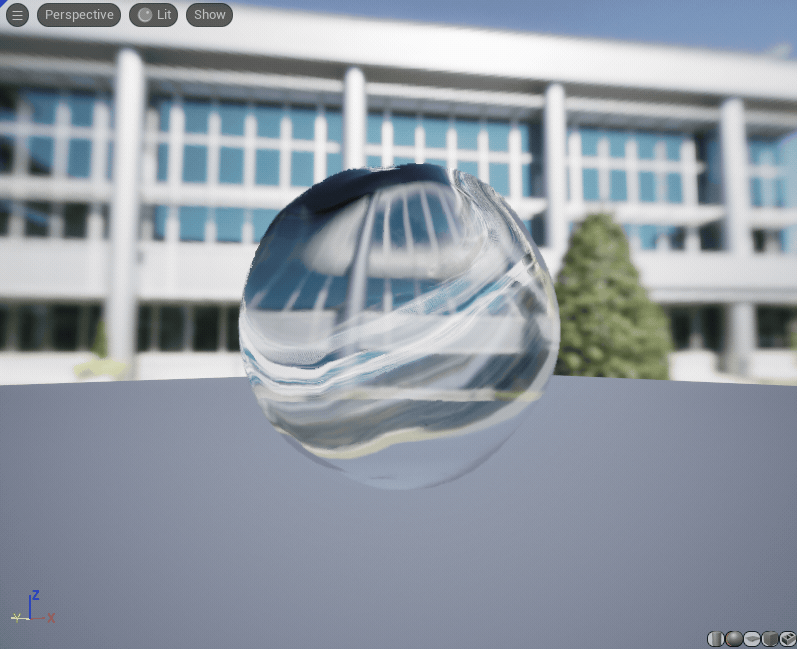
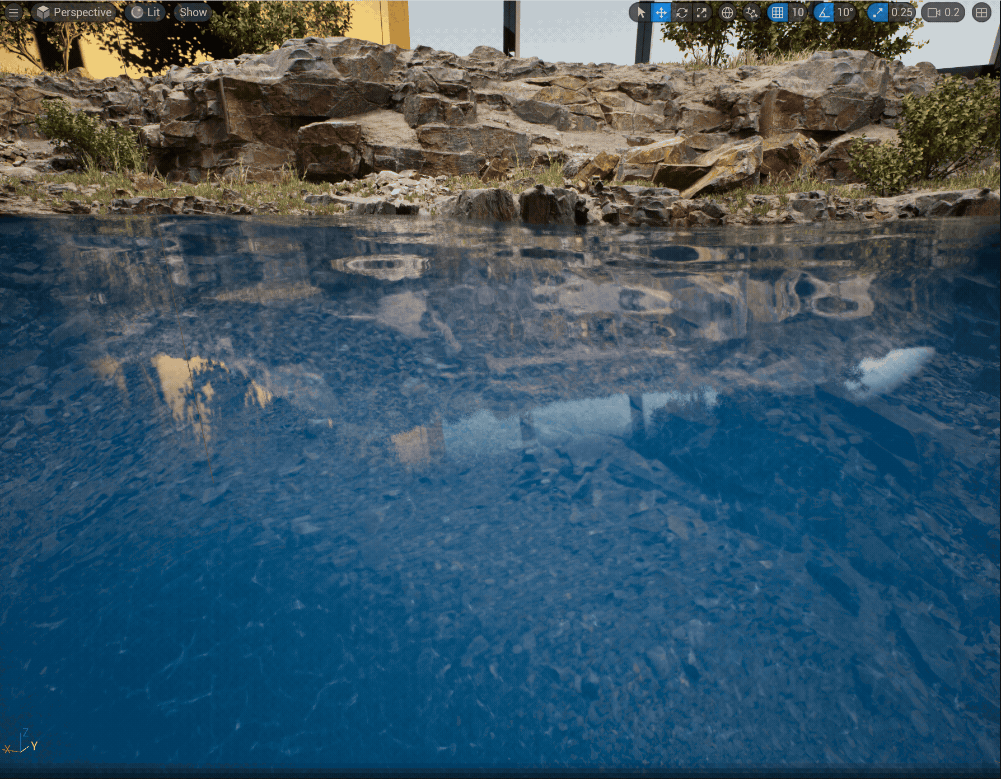
创建一个水面材质 M_Water (选择性开启Two Sided),其中的就是比较常规的内容了,例如用噪声贴图添加局部位移/法线细节,计算光线穿行距离并染色,模拟折射,计算水深以模拟焦散,处理菲涅尔效应等,内容比较多且杂乱(很难以图文形式展示),但不是很难理解,可以下载材质自行探索,里面都有详细注释。单独的水面材质效果如下:
额外创建一个 M_WaterSurface 材质,勾选 Two Sided,仅保留 M_Water 材质中计算顶点位移的部分,后面会用:

水下后处理材质
创建水下后处理材质MP_UnderWater,其中的水下焦散和散射模拟同样比较常规,就不赘述(水下的焦散没有再计算一次Gerstner波来应用扭曲,重复计算量比较大,后续可以用RT来优化这方面)。比较麻烦的是水和空气交界处的水线效果:
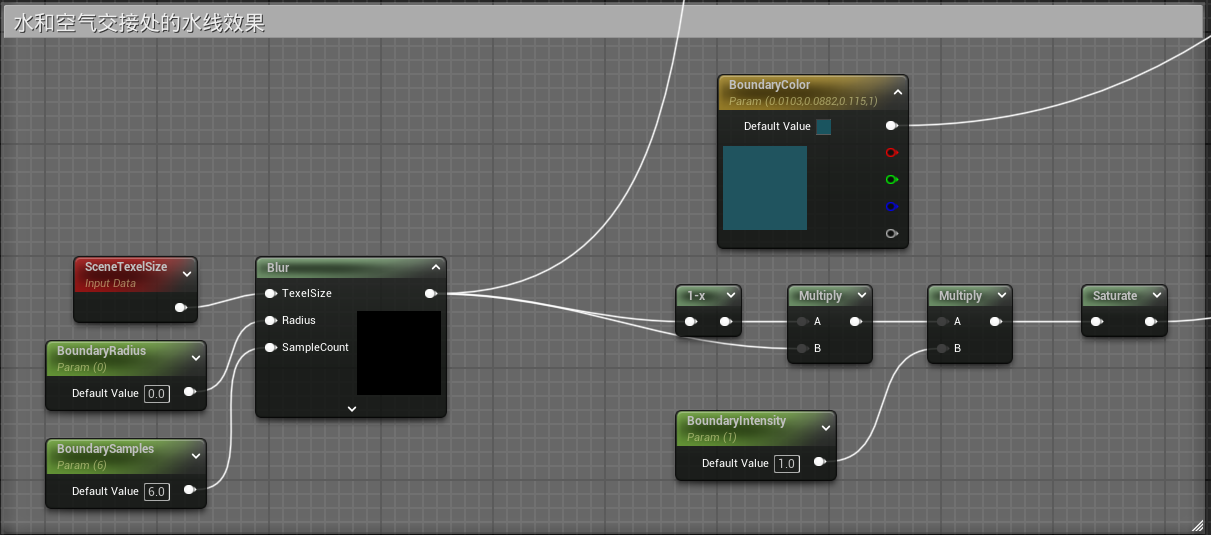
这里的 Blur 是一个自定义节点,完整代码请查看:点击跳转或手动查看:代码附录,其中有一些额外的技巧,请接着往下看:
核心思路是先得到这样的一个标识水线的模板:
然后对其进行模糊,翻转(1-x)后相乘,就可以得到中间的分界线
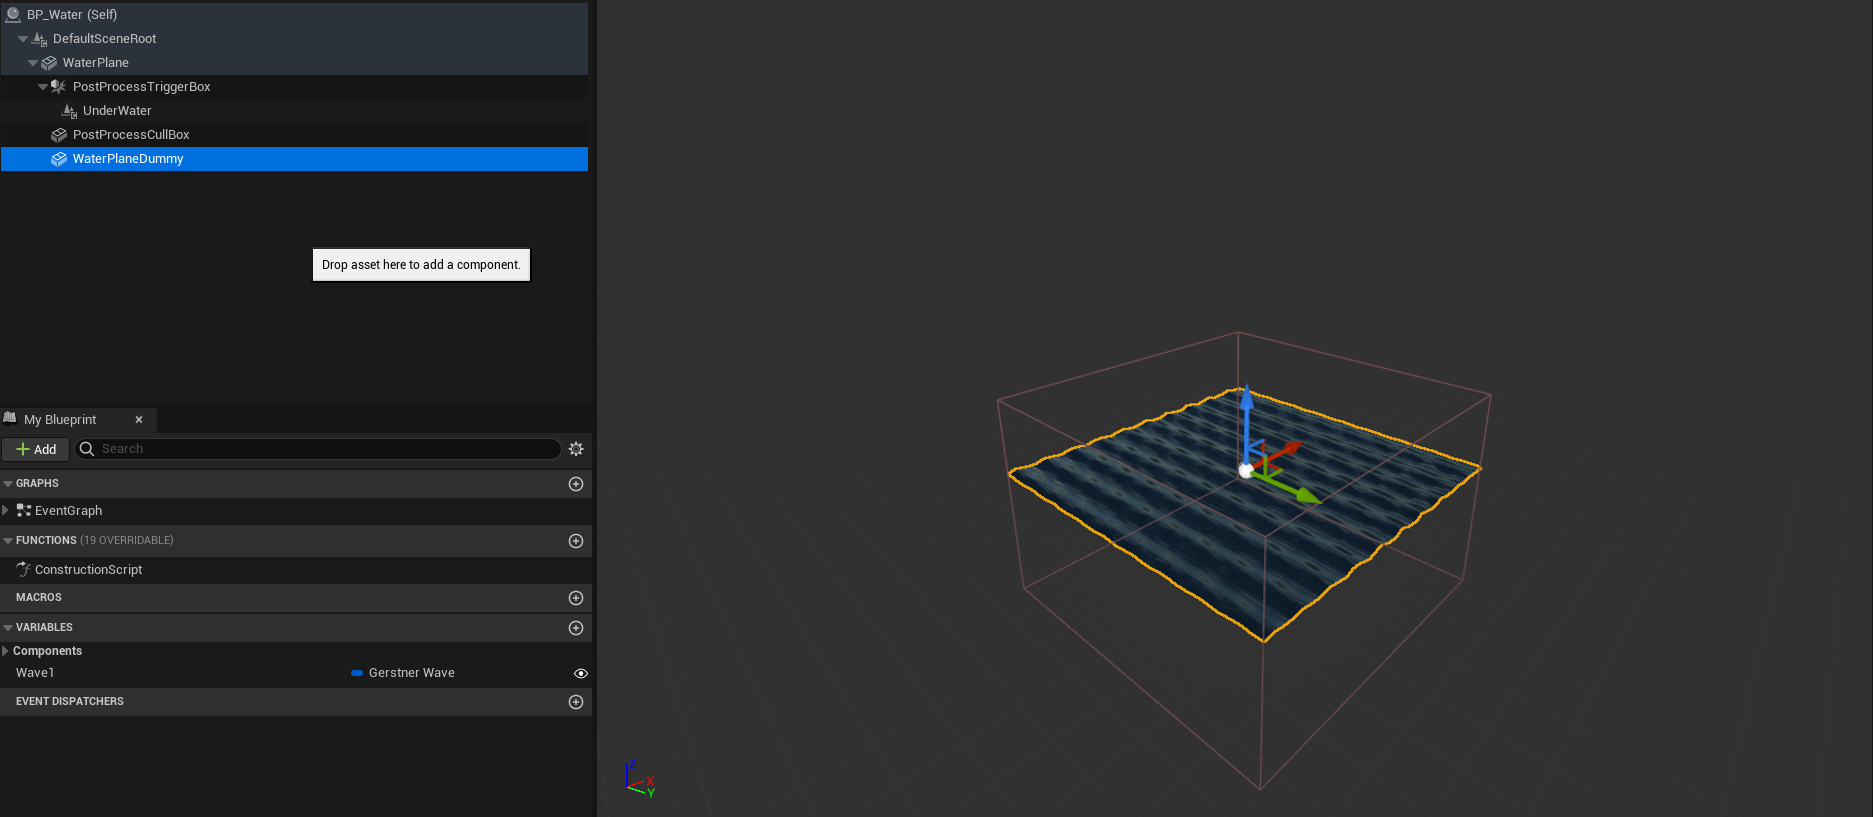
为了得到这个模板,我们需要构建一个蓝图 BP_Water,依次添加下面的组件,首先是水面(应用 M_Water 材质):
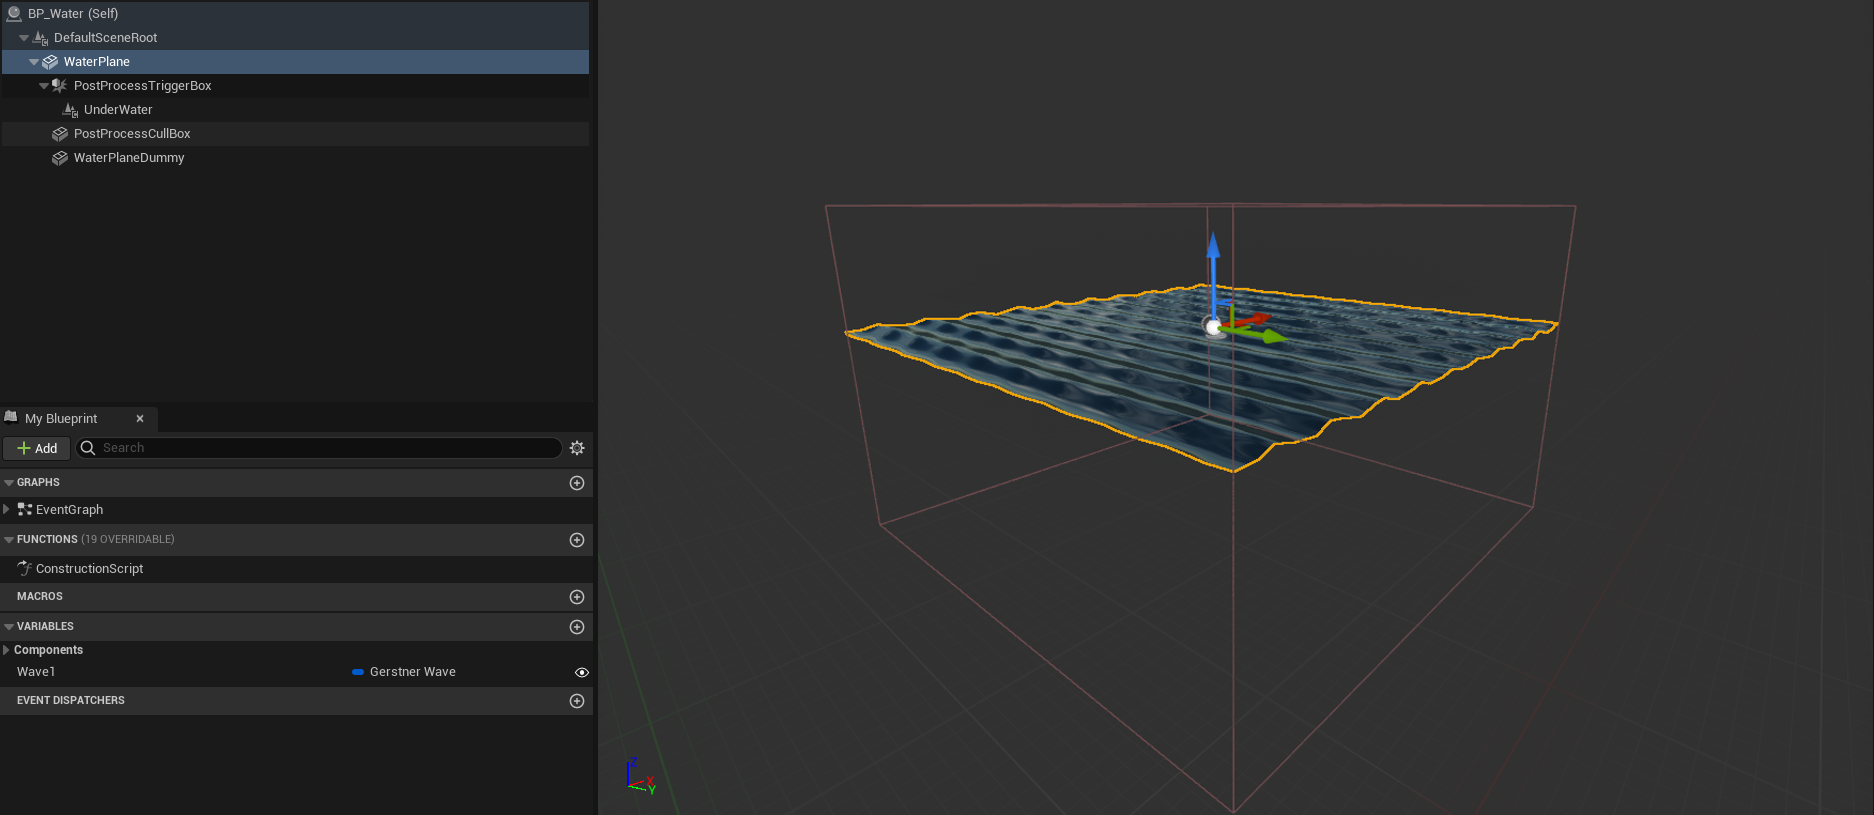
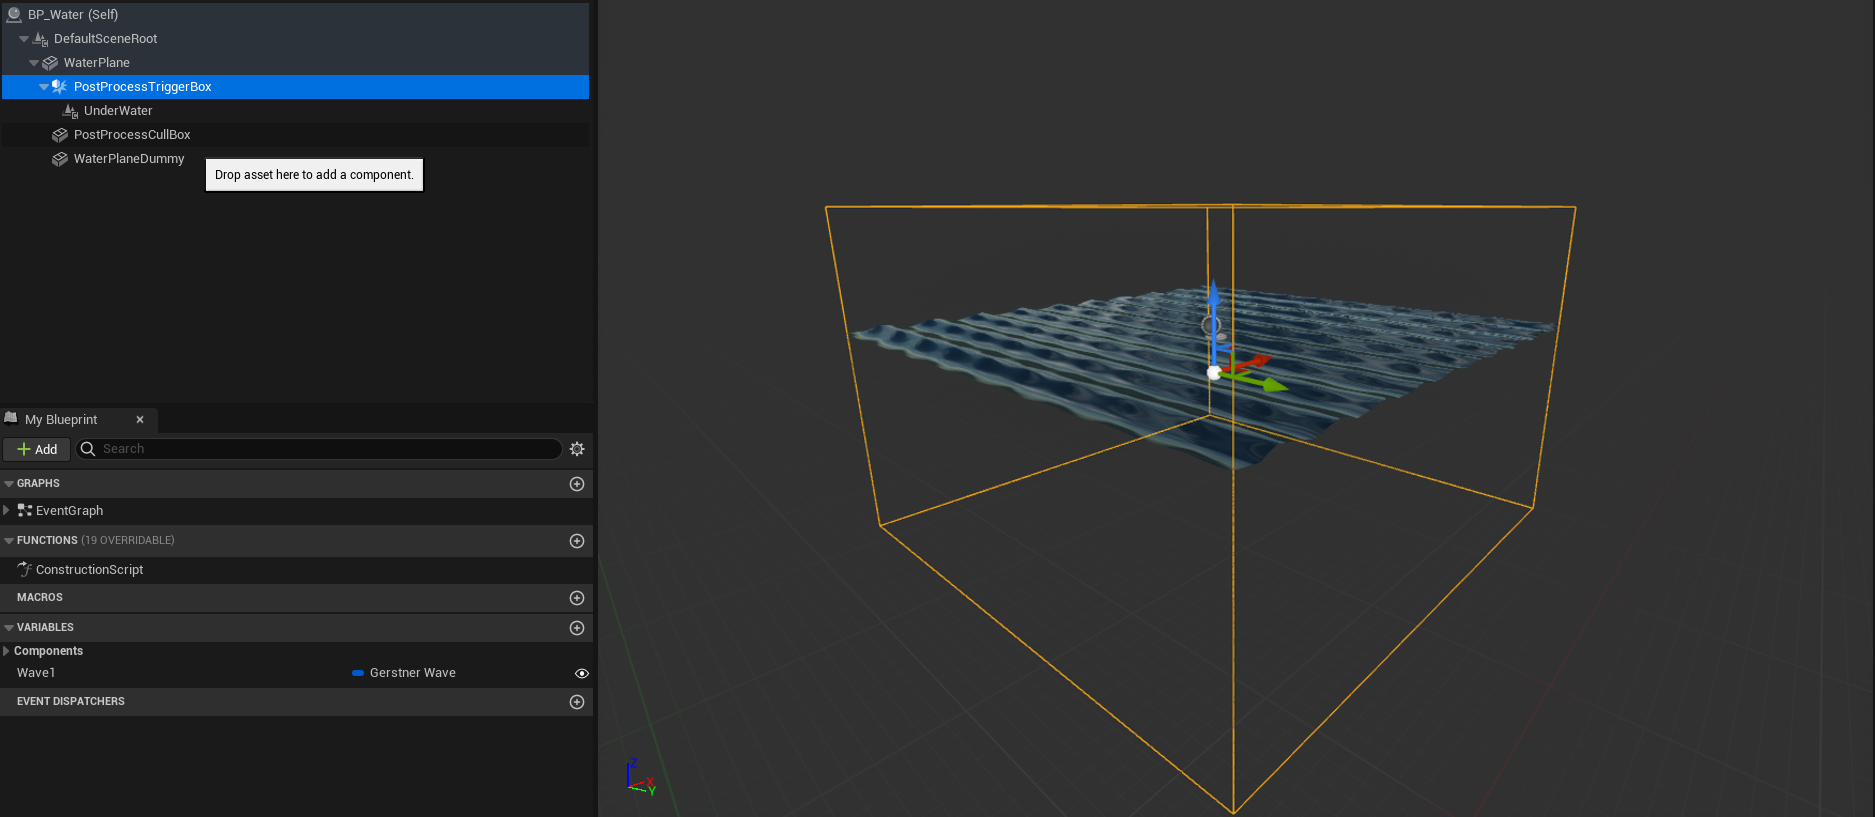
一个 BoxCollision 用于初步定义 PostProcess 的大致触发范围,并向其添加子组件Post Process Component,应用 MP_UnderWater 材质:
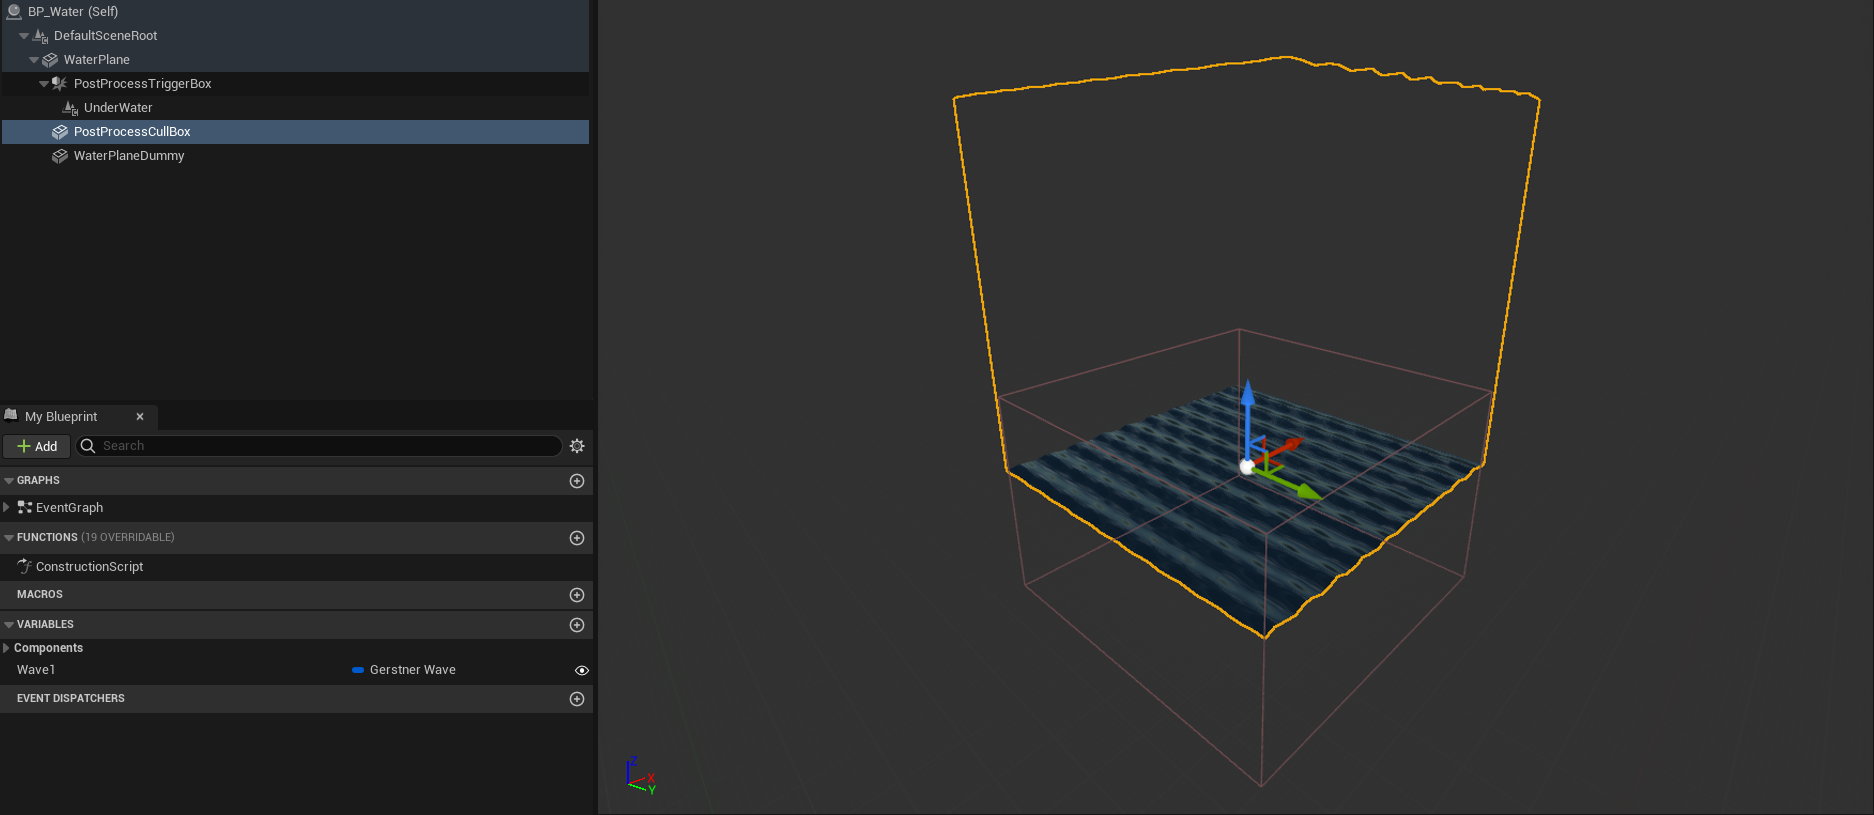
一个立方体,底部和水面平齐,并在细节面板取消 "Render->Render in Main Pass" 和 "Render->Render in Depth Pass",勾选 "Render->Render CustomDepth Pass",调整 "Render->CustomDepth Stencil Value" 为1,应用 M_WaterSurface 材质
一个额外的平面,将其z轴相较真正的水平面下移大概 0.03 防止重叠,同样在细节面板取消 "Render->Render in Main Pass" 和 "Render->Render in Depth Pass",调整 "Render->CustomDepth Stencil Value" 为2,应用 M_WaterSurface 材质
注意开启 "Project Settings->Engine->Rendering->PostProcessing->Custom Depth-Stencil Pass" 选择 "Enable with Stencil"
上面两个不可见物体就是专门负责绘制标识水线的模板,将上面立方体的模板区域减去平面的模板区域,就是正确的标识水线的模板,这里的逻辑,可以实际操作并且想象一下。方法比较复杂,是因为其覆盖了一些极端情况,例如当摄像机位于水面交界处,且从水面下朝上方观察时。这里重复计算了3次Gerstner波,后续可以用 RT 来优化。这部分逻辑对应的就是上面 MP_UnderWater 自定义节点Blur中的:
    // ...
    // 从Custom Stencil纹理中查找模板值,并生成一个“水下”遮罩。
    float stencilValue = SceneTextureLookup(SampleUV, 25, false).r;
    // 检查模板值是否为1。此为包裹水体范围的不可见立方体,双面渲染
    int stencil1 = (abs(stencilValue - 1.0) < 0.001) ? 1 : 0;
    // 检查模板值是否为2。此为额外的不可见水面,略微位于水面下方
    int stencil2 = (abs(stencilValue - 2.0) < 0.001) ? 1 : 0;

    // 生成水下区域的二值遮罩 (1 for underwater, 0 for not)
    int underWater = 1 - saturate(stencil1 - stencil2);
    // ...
最终的蓝图效果如下:
浮力交互
下面来构建一个受 UWaterWorldSubsystem 这个子系统驱动的、可重用的浮力组件 (Buoyancy Component),它可以被附加到任何需要浮力的Actor上(比如船、木桶、尸体等),创建一个 BuoyancyComponent 类,继承自 ActorComponent。点击跳转或手动查看:代码附录
创建一个蓝图类测试一下,例如 BP_Boat,继承自Actor,在组件面板中,添加一个 Static Mesh Component,选择一个任意的网格体,将其拖拽到默认根组件上使其变成新的根组件,在其 Details 面板中,找到 Physics 分类,勾选 Simulate Physics,然后再添加上面创建的 BuoyancyComponent
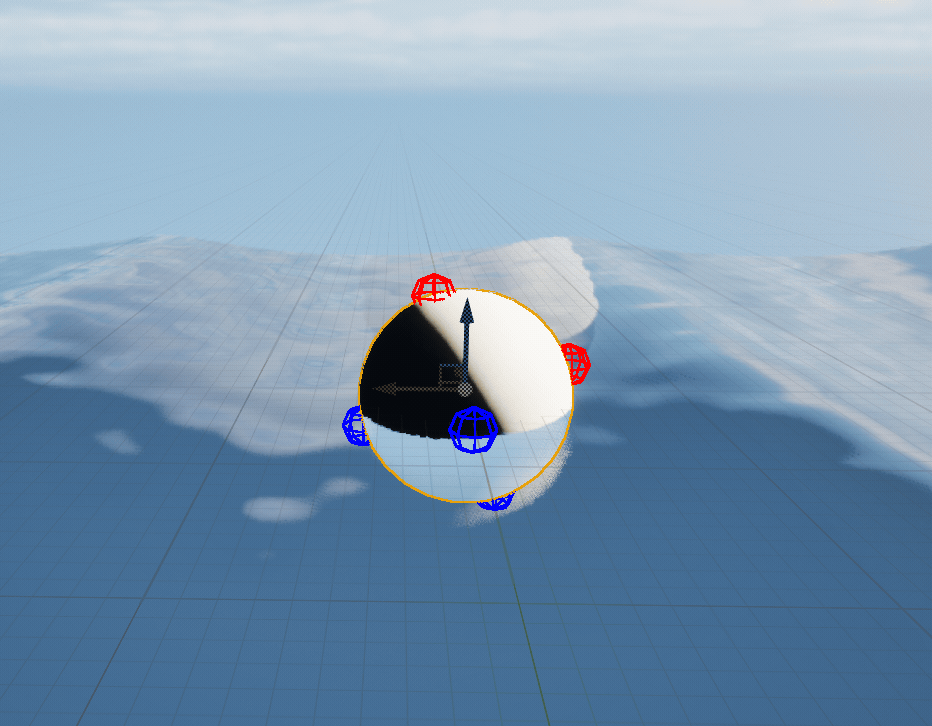
放置一个 BP_Boat 在场景中的 BP_Water 上(记得关闭 BP_Water 中的所有碰撞),为浮力组件添加一些浮筒点测试一下:
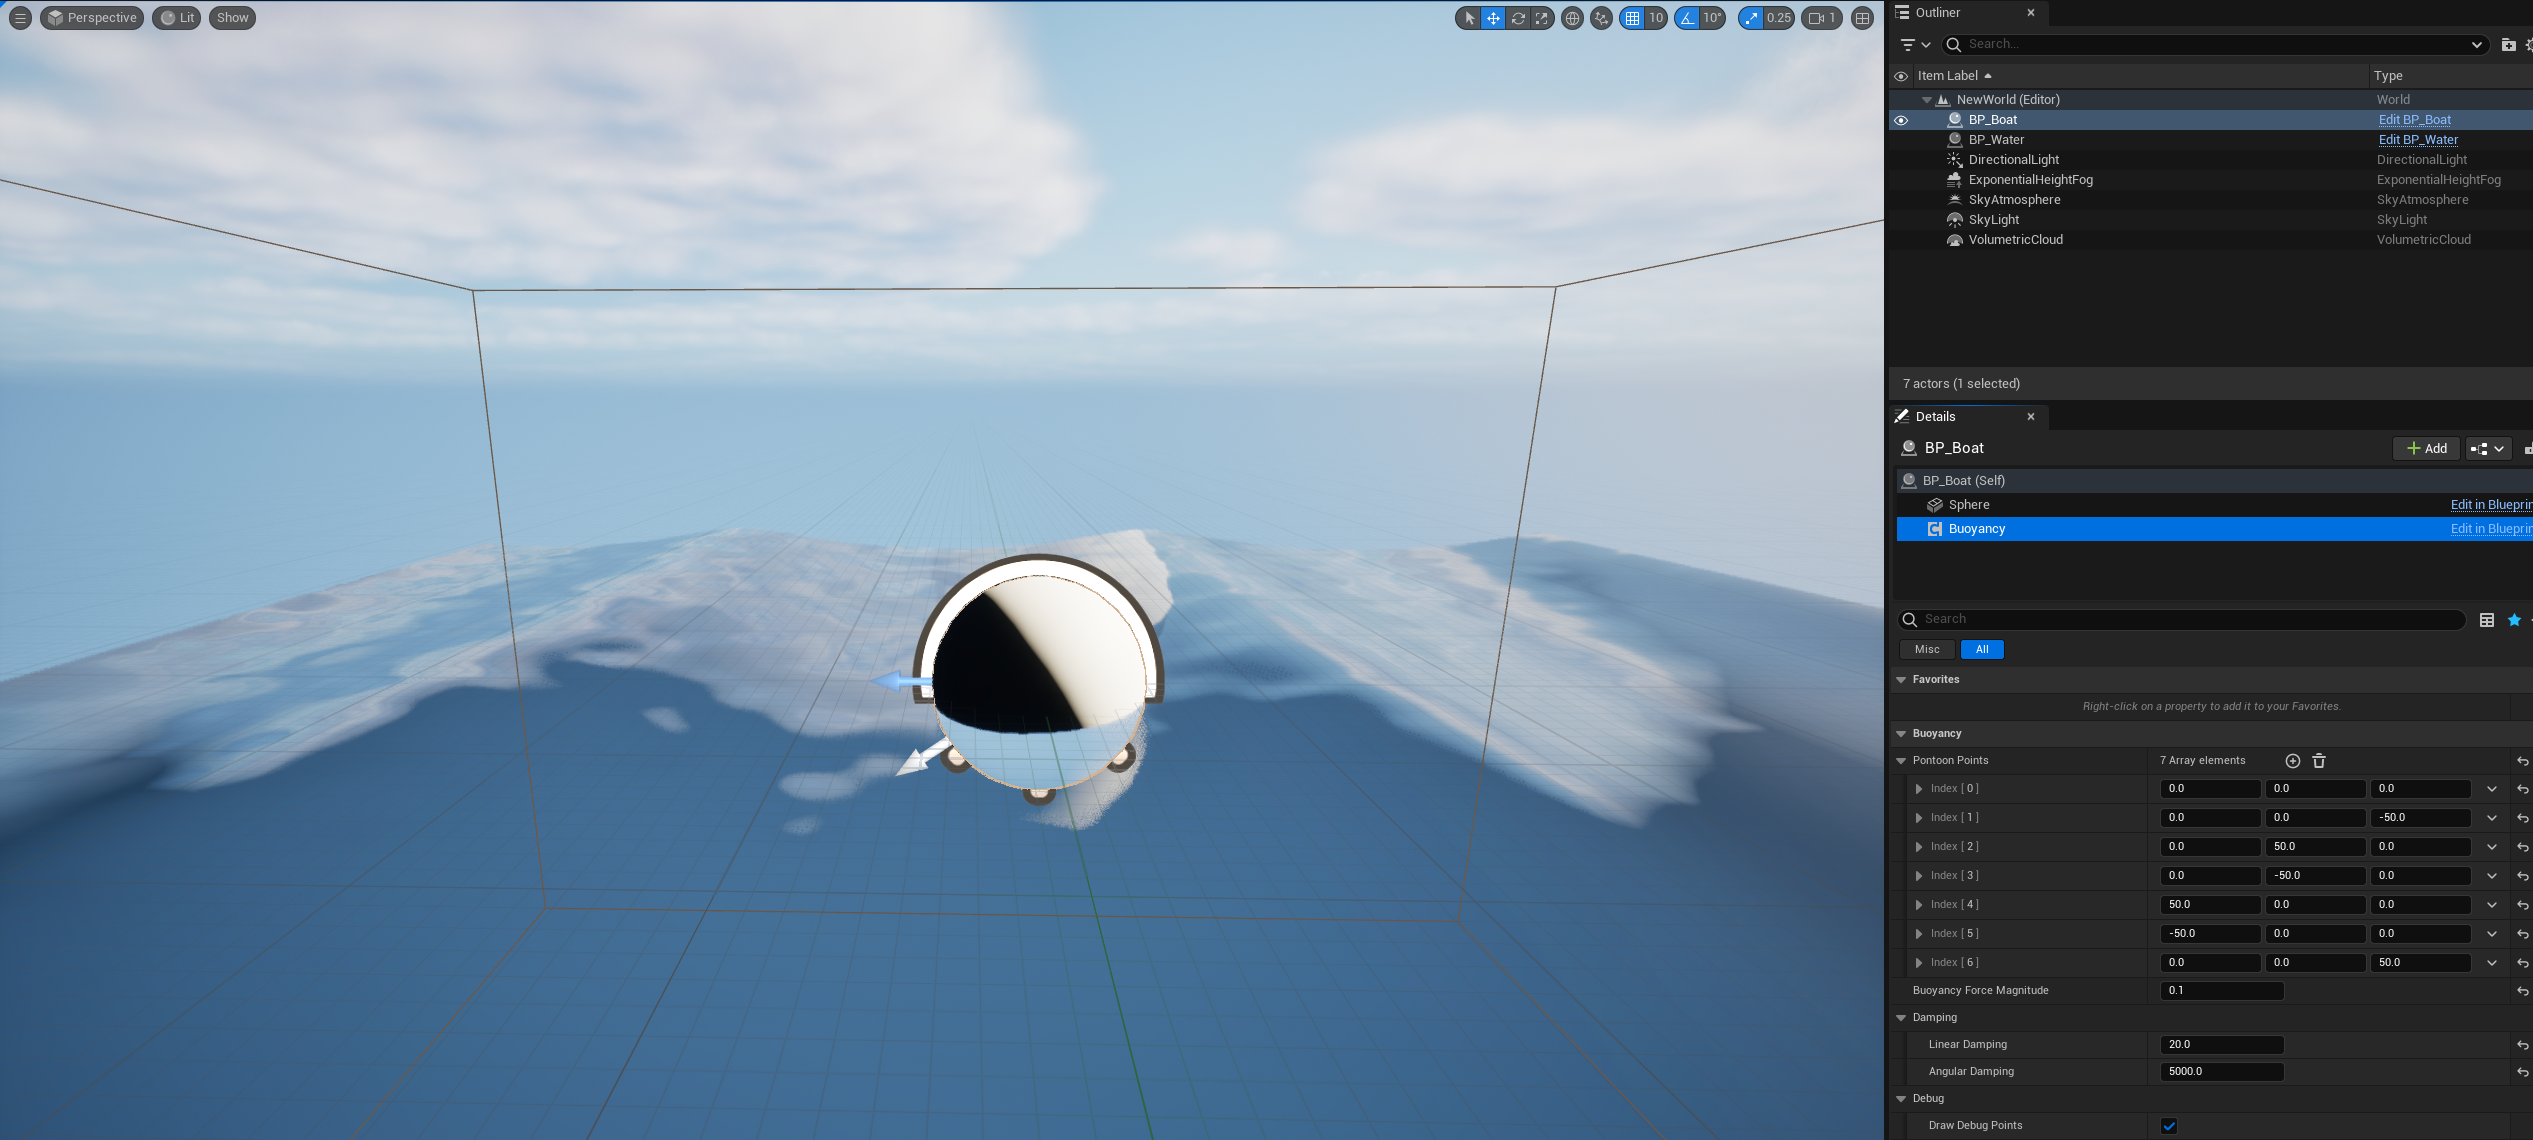
浮筒点为红色代表在水上,蓝色代表在水下,效果还比较初级,很多时候物体只是在做往复运动,这是因为目前的方法本质上是一个理想弹簧模型,在没有足够阻尼的情况下,物体会在平衡点附近永不停歇地振荡。物体在水中收到的阻尼力是很复杂的,低速时主要为粘性阻尼,高速时存在压力阻尼,这些又与横截面等因素相关,就不在本教程讨论范围内了:
近岸浮沫
WIP...
附录
代码
动态与程序化材质-天空系统:
// AstroBlueprintFunctionLibrary.h
#pragma once

#include "CoreMinimal.h"
#include "Kismet/BlueprintFunctionLibrary.h"
#include "Misc/DateTime.h"
#include "AstroBlueprintFunctionLibrary.generated.h"

/**
 *
 */

// 输出太阳位置的结构体,方便在蓝图中一次性获取多个值
USTRUCT(BlueprintType)
struct FSunPositionData
{
	GENERATED_BODY()

	// 太阳在天空中的方向(本地坐标系:X=北, Y=东, Z=天顶)
	UPROPERTY(BlueprintReadOnly, Category = "Astronomy")
	FVector DirectionVector;

	// 驱动定向光的旋转体
	UPROPERTY(BlueprintReadOnly, Category = "Astronomy")
	FRotator LightSourceRotation;

	// 太阳的方位角(0=北, 90=东, 180=南, 270=西)
	UPROPERTY(BlueprintReadOnly, Category = "Astronomy")
	float Azimuth;

	// 太阳的高度角/海拔角(-90=地平线下, 0=地平线, 90=天顶)
	UPROPERTY(BlueprintReadOnly, Category = "Astronomy")
	float Altitude;

	// 太阳是否在地平线以上
	UPROPERTY(BlueprintReadOnly, Category = "Astronomy")
	bool bIsUp;
};

UCLASS()
class EXMATERIAL_API UAstroBlueprintFunctionLibrary : public UBlueprintFunctionLibrary
{
	GENERATED_BODY()

public:

	/**
	 * 1. 计算黄道极(地球公转轨道法线)相对于地球自转轴(世界Z轴)的向量。
	 * @param AxialTiltDegrees 黄赤交角(地球倾角),通常为 23.44 度。
	 * @return 代表黄道极方向的单位向量。
	 */
	UFUNCTION(BlueprintPure, Category = "Astronomy|Advanced", meta = (DisplayName = "Get Ecliptic Pole Axis"))
	static FVector GetEclipticPoleAxis(float AxialTiltDegrees = 23.44f);

	/**
	 * 2. 计算天球的旋转。这代表了从观察者角度看,恒星围绕天北极的视运动。
	 * @param UTCDateTime 当前的协调世界时(UTC)。
	 * @param Longitude 观察者的经度(-180 到 180,东经为正)。
	 * @return float,代表沿旋转轴的旋转角
	 */
	UFUNCTION(BlueprintPure, Category = "Astronomy|Advanced", meta = (DisplayName = "Calculate Celestial Sphere Rotation (LST)"))
	static float CalculateCelestialRotation(const FDateTime& UTCDateTime, float Longitude);

	/**
	 * 3. 计算太阳在特定时间、特定地点的精确位置。
	 * @param UTCDateTime 当前的协调世界时(UTC)。
	 * @param Latitude 观察者的纬度(-90 到 90,北纬为正)。
	 * @param Longitude 观察者的经度(-180 到 180,东经为正)。
	 * @param AxialTiltDegrees 黄赤交角(地球倾角),通常为 23.44 度。
	 * @return 包含太阳方向向量、光源旋转体、方位角和高度角等信息的结构体。
	 */
	UFUNCTION(BlueprintPure, Category = "Astronomy|Advanced", meta = (DisplayName = "Calculate Sun Position"))
	static FSunPositionData CalculateSunPosition(const FDateTime& UTCDateTime, float Latitude, float Longitude, float AxialTiltDegrees = 23.44f);
};// AstroBlueprintFunctionLibrary.cpp
#include "AstroBlueprintFunctionLibrary.h"
// 辅助函数
namespace
{
// 计算从J2000.0 epoch (2000-01-01 12:00:00 UTC) 起的天数
double GetJulianDate(const FDateTime& DateTime)
{
return DateTime.GetJulianDay() - 2451545.0;
}
// 计算格林尼治平均恒星时 (GMST) in degrees
double CalculateGMST(double JulianDate)
{
double T = JulianDate / 36525.0;
// IAU-82 简化公式
double GMST_Hours = 6.697374558 + 2400.051336 * T + 0.000025862 * T * T;
GMST_Hours += (double)JulianDate * 24.0 * 1.00273790935; // 添加当天自转部分
// 归一化到 0-24 小时
GMST_Hours = FGenericPlatformMath::Fmod(GMST_Hours, 24.0);
if (GMST_Hours < 0) GMST_Hours += 24.0;
return GMST_Hours * 15.0; // 转换为度
}
}
FVector UAstroBlueprintFunctionLibrary::GetEclipticPoleAxis(float AxialTiltDegrees)
{
const float ObliquityRadians = FMath::DegreesToRadians(AxialTiltDegrees);
// 将世界Z轴(0,0,1)绕Y轴旋转一个倾角,得到黄道极
return FVector(
FMath::Sin(ObliquityRadians),
0.0f,
FMath::Cos(ObliquityRadians)
).GetSafeNormal();
}
float UAstroBlueprintFunctionLibrary::CalculateCelestialRotation(const FDateTime& UTCDateTime, float Longitude)
{
const double JulianDate = GetJulianDate(UTCDateTime);
const double GMST_Degrees = CalculateGMST(JulianDate);
// 本地恒星时 (LST) = 格林尼治恒星时 + 观察者经度
const double LST_Degrees = GMST_Degrees + Longitude;
// 返回的Rotator,Yaw(Z轴)代表了天球的旋转
// 恒星从东方升起(LST增加),所以天球需要顺时针旋转(从上往下看),UE中是负值
return LST_Degrees;
}
FSunPositionData UAstroBlueprintFunctionLibrary::CalculateSunPosition(const FDateTime& UTCDateTime, float Latitude, float Longitude, float AxialTiltDegrees)
{
// --- 1. 计算太阳在黄道坐标系的位置 ---
const double JulianDate = GetJulianDate(UTCDateTime);
const float AxialTiltRad = FMath::DegreesToRadians(AxialTiltDegrees);
// 简化公式计算黄经 (Ecliptic Longitude)
const double MeanLongitude_Deg = fmod(280.460 + 0.9856474 * JulianDate, 360.0);
const double MeanAnomaly_Rad = FMath::DegreesToRadians(fmod(357.528 + 0.9856003 * JulianDate, 360.0));
const double EclipticLongitude_Rad = FMath::DegreesToRadians(MeanLongitude_Deg) + 1.915 * FMath::Sin(MeanAnomaly_Rad) + 0.020 * FMath::Sin(2 * MeanAnomaly_Rad);
// --- 2. 转换到赤道坐标系 (赤经 Right Ascension, 赤纬 Declination) ---
const double Declination_Rad = FMath::Asin(FMath::Sin(EclipticLongitude_Rad) * FMath::Sin(AxialTiltRad));
double RightAscension_Rad = FMath::Atan2(FMath::Cos(AxialTiltRad) * FMath::Sin(EclipticLongitude_Rad), FMath::Cos(EclipticLongitude_Rad));
if (RightAscension_Rad < 0) RightAscension_Rad += 2 * PI;
// --- 3. 转换到本地水平坐标系 (方位角 Azimuth, 高度角 Altitude) ---
const double GMST_Degrees = CalculateGMST(JulianDate);
const double LST_Degrees = GMST_Degrees + Longitude;
const double LST_Rad = FMath::DegreesToRadians(LST_Degrees);
const float Latitude_Rad = FMath::DegreesToRadians(Latitude);
// 时角 (Hour Angle)
const double HourAngle_Rad = LST_Rad - RightAscension_Rad;
// 计算高度角
const double Altitude_Rad = FMath::Asin(
FMath::Sin(Declination_Rad) * FMath::Sin(Latitude_Rad) +
FMath::Cos(Declination_Rad) * FMath::Cos(Latitude_Rad) * FMath::Cos(HourAngle_Rad)
);
// 计算方位角
double Azimuth_Rad = FMath::Atan2(
FMath::Sin(HourAngle_Rad),
FMath::Cos(HourAngle_Rad) * FMath::Sin(Latitude_Rad) - FMath::Tan(Declination_Rad) * FMath::Cos(Latitude_Rad)
);
Azimuth_Rad += PI; // 从南向转为北向 (0=北, PI/2=东)
// --- 4. 填充返回结构体 ---
FSunPositionData Result;
Result.Altitude = FMath::RadiansToDegrees(Altitude_Rad);
Result.Azimuth = FMath::RadiansToDegrees(Azimuth_Rad);
Result.bIsUp = Result.Altitude > 0;
// 创建方向向量(本地坐标系:+X=北, +Y=东, +Z=天顶)
// Azimuth从北开始顺时针,而UE的XY平面角度从X轴逆时针
// 需要转换一下:cos(az) -> x, sin(az) -> y
Result.DirectionVector = FVector(
FMath::Cos(Altitude_Rad) * FMath::Cos(Azimuth_Rad),
FMath::Cos(Altitude_Rad) * FMath::Sin(Azimuth_Rad),
FMath::Sin(Altitude_Rad)
);
// UE的定向光方向是其Actor的-X轴
// 所以需要创建一个旋转体,使其X轴指向太阳
Result.LightSourceRotation = Result.DirectionVector.ToOrientationRotator();
return Result;
}水体系统-核心组件:
// WaterWorldSubsystem.h
#pragma once

#include "CoreMinimal.h"
#include "Subsystems/WorldSubsystem.h"
#include "Kismet/KismetMathLibrary.h"
#include "WaterSettings.h"
#include "WaterWorldSubsystem.generated.h"

/**
 * @brief 水体系统世界子系统
 * 该子系统负责管理当前世界中的水体效果
 * 它作为一个中心枢纽,处理波浪参数的计算、更新,并将数据推送到GPU(通过MPC)
 * 同时,它也为CPU端(如蓝图或游戏逻辑)提供查询水面信息的接口
 * 额外继承自 FTickableGameObject 使其能够拥有自己的Tick函数,以实现每帧更新
 */
UCLASS()
class EXMATERIAL_API UWaterWorldSubsystem : public UWorldSubsystem, public FTickableGameObject
{
	GENERATED_BODY()

public:
	//~ Begin USubsystem Interface
	virtual void Initialize(FSubsystemCollectionBase& Collection) override;
	virtual void Deinitialize() override;
	//~ End USubsystem Interface

	//~ Begin FTickableGameObject Interface
	virtual void Tick(float DeltaTime) override;
	virtual TStatId GetStatId() const override { return TStatId(); }
	virtual bool IsTickable() const override { return !IsTemplate(); }
	//~ End FTickableGameObject Interface

	// 波浪参数setter
	void SetWavelength(float Wavelength, int32 Index);
	// 按需添加...

	// CPU查询接口,供游戏逻辑(如浮力、特效放置等)调用
	/**
	 * @brief 在给定的水平位置(X, Y)查询当前的水面高度(Z)
	 * 这是一个CPU端的计算,与GPU渲染的波浪效果保持一致
	 * @param InLocation 要查询的世界坐标(主要使用X和Y)
	 * @param OutHeight 计算出的水面世界高度(Z)
	 * @return 如果计算成功,返回true
	 */
	UFUNCTION(BlueprintCallable, Category="水体系统|查询")
	bool GetWaveHeight(const FVector& InLocation, float& OutHeight) const;

	// 更新材质参数集 (MPC)
	/**
	 * @brief 将当前的波浪参数和全局时间等数据更新到指定的MPC中。
	 */
	void UpdateWaterMPC();

private:
	float GlobalTime = 0.0f;

	// 指向项目设置中配置的水体数据资产 (Data Asset) 的指针
	UPROPERTY()
	TObjectPtr<const UWaterSettings> ActiveWaterSettings;

	// 可修改的参数拷贝
	UPROPERTY()
	TArray<FGerstnerWave> CurrentWaveParameters;

	// 内部计算函数
	bool GerstnerWaveDisplacement(const FVector& InLocation, FVector& OutDisplacement) const;
	bool GerstnerWaveDisplacementAndNormal(const FVector& InLocation, FVector& OutDisplacement, FVector& OutNormal) const;
};// WaterWorldSubsystem.cpp
#include "WaterWorldSubsystem.h"
#include "Materials/MaterialParameterCollectionInstance.h"
#include "WaterSystemProjectSettings.h"
void UWaterWorldSubsystem::Initialize(FSubsystemCollectionBase& Collection)
{
Super::Initialize(Collection);
// 从项目设置中获取配置好的水体数据资产
const UWaterSystemProjectSettings* ProjSettings = GetDefault<UWaterSystemProjectSettings>();
if (ProjSettings && !ProjSettings->DefaultWaterSettings.IsNull())
{
// 尝试同步加载在项目设置中指定的数据资产
ActiveWaterSettings = Cast<UWaterSettings>(ProjSettings->DefaultWaterSettings.TryLoad());
}
if (ActiveWaterSettings)
{
UE_LOG(LogTemp, Log, TEXT("WaterWorldSubsystem: initialized with settings from: %s"), *ActiveWaterSettings->GetName());
// 创建数据资产中波浪参数的一个本地可变副本
// 之后所有的运行时修改都将作用于这个 CurrentWaveParameters 数组
// 而不是直接修改原始的 ActiveWaterSettings 数据资产
CurrentWaveParameters = ActiveWaterSettings->WaveParameters;
}
else
{
UE_LOG(LogTemp, Warning, TEXT("WaterWorldSubsystem: No WaterSettings Data Asset found in Project Settings. System will be inactive."));
// 为防止后续操作因空指针崩溃,清空数组
CurrentWaveParameters.Empty();
}
// 在第一帧就立即更新一次MPC
UpdateWaterMPC();
}
void UWaterWorldSubsystem::Deinitialize()
{
Super::Deinitialize();
}
void UWaterWorldSubsystem::Tick(float DeltaTime)
{
// 更新全局时间
GlobalTime += DeltaTime;
// 每一帧都将最新的数据推送到MPC
UpdateWaterMPC();
}
void UWaterWorldSubsystem::SetWavelength(float Wavelength, int32 Index)
{
if (CurrentWaveParameters.IsValidIndex(Index))
{
CurrentWaveParameters[Index].Wavelength = FMath::Max(1.f, Wavelength);
}
}
bool UWaterWorldSubsystem::GetWaveHeight(const FVector& InLocation, float& OutHeight) const
{
// 假设水平面基础高度为 0
const float BaseHeight = 0.0f;
// 只关心Z轴位移,但计算需要完整的位置
FVector Displacement;
if(GerstnerWaveDisplacement(InLocation, Displacement))
{
OutHeight = BaseHeight + Displacement.Z;
return true;
}
return false;
}
void UWaterWorldSubsystem::UpdateWaterMPC()
{
if (!ActiveWaterSettings || !ActiveWaterSettings->WaterMPC) return;
// 获取MPC的实例,以便修改它
UMaterialParameterCollectionInstance* MPCInstance = GetWorld()->GetParameterCollectionInstance(ActiveWaterSettings->WaterMPC);
if (!MPCInstance)
{
UE_LOG(LogTemp, Warning, TEXT("WaterWorldSubsystem: No MPC instance found."));
return;
}
// 1. 更新全局时间
MPCInstance->SetScalarParameterValue("GlobalTime", GlobalTime);
// 2. 遍历C++波浪数组,更新MPC参数
const int32 MaxWavesInMPC = ActiveWaterSettings->MaxWavesInMPC;
for (int32 i = 0; i < MaxWavesInMPC; ++i)
{
// 构造参数名
const FName ParamNameA = *FString::Printf(TEXT("WaveParamsA%d"), i + 1);
const FName ParamNameB = *FString::Printf(TEXT("WaveParamsB%d"), i + 1);
if (i < CurrentWaveParameters.Num())
{
// 如果C++数组中有这个波,打包并发送数据
const FGerstnerWave& Wave = CurrentWaveParameters[i];
FLinearColor ParamsA(Wave.Wavelength, Wave.Amplitude, Wave.Steepness, 0.f);
FLinearColor ParamsB(Wave.Direction.X, Wave.Direction.Y, 0.f, 0.f);
MPCInstance->SetVectorParameterValue(ParamNameA, ParamsA);
MPCInstance->SetVectorParameterValue(ParamNameB, ParamsB);
}
else
{
// 如果C++数组中没有这个波了(例如只定义了2个波),
// 将MPC中对应的参数清零,使其失效
// 尤其要把振幅设为0
MPCInstance->SetVectorParameterValue(ParamNameA, FLinearColor::Black);
MPCInstance->SetVectorParameterValue(ParamNameB, FLinearColor::Black);
}
}
}
bool UWaterWorldSubsystem::GerstnerWaveDisplacement(const FVector& InLocation, FVector& OutDisplacement) const
{
FVector TotalDisplacement = FVector::ZeroVector;
const float CurrentTime = GlobalTime;
for (const FGerstnerWave& Wave : CurrentWaveParameters)
{
const float W = (2.0f * PI) / Wave.Wavelength;
const float Phi = FMath::Sqrt(980.0f * W);
const float Q = Wave.Steepness / (W * Wave.Amplitude);
const float Arg = FVector2D::DotProduct(Wave.Direction, FVector2D(InLocation.X, InLocation.Y)) * W - Phi * CurrentTime;
const float CosVal = FMath::Cos(Arg);
const float SinVal = FMath::Sin(Arg);
// --- 累加位移 ---
TotalDisplacement.X += Q * Wave.Amplitude * Wave.Direction.X * CosVal;
TotalDisplacement.Y += Q * Wave.Amplitude * Wave.Direction.Y * CosVal;
TotalDisplacement.Z += Wave.Amplitude * SinVal;
}
OutDisplacement = TotalDisplacement;
return true;
}
bool UWaterWorldSubsystem::GerstnerWaveDisplacementAndNormal(const FVector& InLocation, FVector& OutDisplacement,
FVector& OutNormal) const
{
FVector TotalDisplacement = FVector::ZeroVector;
FVector NormalSum = FVector::ZeroVector; // 用于累加法线的XYZ分量
const float CurrentTime = GlobalTime;
for (const FGerstnerWave& Wave : CurrentWaveParameters)
{
const float W = (2.0f * PI) / Wave.Wavelength;
const float Phi = FMath::Sqrt(980.0f * W);
const float Q = Wave.Steepness / (W * Wave.Amplitude);
const float Arg = FVector2D::DotProduct(Wave.Direction, FVector2D(InLocation.X, InLocation.Y)) * W - Phi * CurrentTime;
const float CosVal = FMath::Cos(Arg);
const float SinVal = FMath::Sin(Arg);
// --- 累加位移 ---
TotalDisplacement.X += Q * Wave.Amplitude * Wave.Direction.X * CosVal;
TotalDisplacement.Y += Q * Wave.Amplitude * Wave.Direction.Y * CosVal;
TotalDisplacement.Z += Wave.Amplitude * SinVal;
// --- 累加法线分量 ---
NormalSum.X += Wave.Direction.X * W * Wave.Amplitude * CosVal;
NormalSum.Y += Wave.Direction.Y * W * Wave.Amplitude * CosVal;
NormalSum.Z += Q * W * Wave.Amplitude * SinVal;
}
OutDisplacement = TotalDisplacement;
// --- 计算最终法线 ---
// N.x = - Σ(...)
// N.y = - Σ(...)
// N.z = 1 - Σ(...)
OutNormal = FVector(
-NormalSum.X,
-NormalSum.Y,
1.0f - NormalSum.Z
);
OutNormal.Normalize(); // 归一化
return true;
}水体系统-水面材质:
// 输入:
//Input 0: WorldPos, Type: Vector3
//Input 1: Time, Type: Scalar
//Input 2-5: WaveParamsA1 到 WaveParamsA4, Type: Vector
//Input 6-9: WaveParamsB1 到 WaveParamsB4, Type: Vector

// 参数打包方式为:
//WaveN_ParamsA: (Wavelength, Amplitude, Steepness)
//WaveN_ParamsB: (Direction.X, Direction.Y, 0.0)

// ---- 主逻辑 ----
float3 totalDisplacement = float3(0,0,0);
float3 normalSum = float3(0,0,0);

// 将输入参数打包成结构体数组
FGerstnerWave waves[4];
waves[0] = MakeGerstnerWave(WaveParamsA1, WaveParamsB1);
waves[1] = MakeGerstnerWave(WaveParamsA2, WaveParamsB2);
waves[2] = MakeGerstnerWave(WaveParamsA3, WaveParamsB3);
waves[3] = MakeGerstnerWave(WaveParamsA4, WaveParamsB4);

// 循环计算所有波的叠加
for(int i = 0; i < 4; i++)
{
    CalculateSingleWave(waves[i], WorldPos, Time, totalDisplacement, normalSum);
}

// 计算最终法线
float3 finalNormal = float3(
    -normalSum.x,
    -normalSum.y,
    1.0f - normalSum.z
);

// 将结果赋给输出引脚
Normal = normalize(finalNormal);

// 因为我们定义了输出引脚,所以主返回值可以为空
return totalDisplacement;
水体系统-水下后处理材质:
// =====================================================================================
// 目的:对基于Custom Stencil的水下区域遮罩进行单向垂直模糊
//
// 输入 :
//  - TexelSize (float2): 屏幕像素大小,连接SceneTexelSize。
//  - Radius (float): 模糊半径的乘数,用于控制垂直模糊的距离
// =====================================================================================

// 定义一个1D的5点高斯核。
// 权重分布为 [0.0625, 0.25, 0.375, 0.25, 0.0625],总和为1
const float Kernel[5] =
{
    0.0625, 0.25, 0.375, 0.25, 0.0625
};

// 初始化最终颜色为黑色。
float3 FinalColor = float3(0, 0, 0);

// 获取当前像素在Custom Stencil纹理上的UV坐标。
float2 UVs = GetDefaultSceneTextureUV(Parameters, 25);

// --- 动态计算循环参数 ---
int samples = max(1, (int)SampleCount);
if (samples % 2 == 0)
{
    samples++;
}
int loop_radius = (samples - 1) / 2;

// 预计算三角形模糊的总权重,用于归一化
// 对于一个从-r到r的线性权重(r - abs(y) + 1),其总和是 (r+1)^2
float totalWeight = (loop_radius + 1) * (loop_radius + 1);

// 仅在垂直方向上遍历邻域像素。
// 循环范围从-2到2,共采样5个点(上方2个,中心1个,下方2个)。
for (int y = -loop_radius; y <= loop_radius; y++)
{
    // 权重与距离中心的距离成反比(线性递减),形成三角形分布
    float weight = (loop_radius - abs(y) + 1) / totalWeight;

    // 计算垂直方向的UV偏移量。
    // 水平偏移量(x)始终为0,确保只在垂直线上采样。
    float2 Offset = float2(0, y) * TexelSize * Radius;
    float2 OriginalSampleUV = UVs + Offset;

    float2 SampleUV = saturate(OriginalSampleUV);


    // 从Custom Stencil纹理中查找模板值,并生成一个“水下”遮罩。
    float stencilValue = SceneTextureLookup(SampleUV, 25, false).r;
    // 检查模板值是否为1。此为包裹水体范围的不可见立方体,双面渲染
    int stencil1 = (abs(stencilValue - 1.0) < 0.001) ? 1 : 0;
    // 检查模板值是否为2。此为额外的不可见水面,位于水面下方
    int stencil2 = (abs(stencilValue - 2.0) < 0.001) ? 1 : 0;

    // 生成水下区域的二值遮罩 (1 for underwater, 0 for not)
    int underWater = 1 - saturate(stencil1 - stencil2);

    // 将水下遮罩值与对应的高斯核权重相乘,并累加到最终颜色中。
    FinalColor += underWater * weight;
}

// 返回计算出的垂直模糊遮罩值。
return FinalColor;
水体系统-浮力交互:
// BuoyancyComponent.h
#pragma once

#include "CoreMinimal.h"
#include "Components/ActorComponent.h"
#include "BuoyancyComponent.generated.h"

class UWaterWorldSubsystem;

UCLASS( ClassGroup=(Custom), meta=(BlueprintSpawnableComponent) )
class EXMATERIAL_API UBuoyancyComponent : public UActorComponent
{
	GENERATED_BODY()

public:
	// Sets default values for this component's properties
	UBuoyancyComponent();

protected:
	// Called when the game starts
	virtual void BeginPlay() override;

public:
	// Called every frame
	virtual void TickComponent(float DeltaTime, ELevelTick TickType, FActorComponentTickFunction* ThisTickFunction) override;

	// 在蓝图中配置的浮筒点(相对于Actor的局部坐标)
	UPROPERTY(EditAnywhere, BlueprintReadWrite, Category = "Buoyancy")
	TArray<FVector> PontoonPoints;

	// 浮力强度系数,可以理解为与流体密度和物体体积相关的系数
	UPROPERTY(EditAnywhere, BlueprintReadWrite, Category = "Buoyancy")
	float BuoyancyForceMagnitude = 10.0f;

	// 线性阻尼,防止物体在水中滑行太远
	UPROPERTY(EditAnywhere, BlueprintReadWrite, Category = "Buoyancy|Damping")
	float LinearDamping = 0.5f;

	// 角速度阻尼,防止物体在水中无限旋转
	UPROPERTY(EditAnywhere, BlueprintReadWrite, Category = "Buoyancy|Damping")
	float AngularDamping = 0.5f;

	// 是否在编辑器中绘制调试点
	UPROPERTY(EditAnywhere, Category = "Buoyancy|Debug")
	bool bDrawDebugPoints = true;

private:
	// 缓存指向Water Subsystem的指针
	UPROPERTY()
	TObjectPtr<UWaterWorldSubsystem> WaterSubsystem;

	// 缓存指向我们要施加力的物理组件的指针
	UPROPERTY()
	TObjectPtr<UPrimitiveComponent> OwningPrimitiveComponent;
};// BuoyancyComponent.cpp
#include "BuoyancyComponent.h"
#include "WaterWorldSubsystem.h" // 引入Subsystem头文件
#include "Kismet/KismetSystemLibrary.h" // For Debug Spheres
// Sets default values for this component's properties
UBuoyancyComponent::UBuoyancyComponent()
{
// Set this component to be initialized when the game starts, and to be ticked every frame. You can turn these features
// off to improve performance if you don't need them.
PrimaryComponentTick.bCanEverTick = true;
// ...
}
// Called when the game starts
void UBuoyancyComponent::BeginPlay()
{
Super::BeginPlay();
// 获取并缓存Water Subsystem
WaterSubsystem = GetWorld()->GetSubsystem<UWaterWorldSubsystem>();
// 获取并缓存父Actor的根组件作为物理目标
// 更好的做法是找到第一个带物理模拟的PrimitiveComponent
OwningPrimitiveComponent = Cast<UPrimitiveComponent>(GetOwner()->GetRootComponent());
if (!WaterSubsystem)
{
UE_LOG(LogTemp, Error, TEXT("BuoyancyComponent: WaterWorldSubsystem not found!"));
SetComponentTickEnabled(false);
}
if (!OwningPrimitiveComponent || !OwningPrimitiveComponent->IsSimulatingPhysics())
{
UE_LOG(LogTemp, Error, TEXT("BuoyancyComponent needs to be on an Actor with a root PrimitiveComponent that simulates physics!"));
SetComponentTickEnabled(false);
}
}
// Called every frame
void UBuoyancyComponent::TickComponent(float DeltaTime, ELevelTick TickType, FActorComponentTickFunction* ThisTickFunction)
{
Super::TickComponent(DeltaTime, TickType, ThisTickFunction);
if (!WaterSubsystem || !OwningPrimitiveComponent) return;
float WaterHeight;
const FTransform OwnerTransform = OwningPrimitiveComponent->GetComponentTransform();
const float GravityZ = GetWorld()->GetGravityZ();
for (const FVector& LocalPontoonPoint : PontoonPoints)
{
const FVector WorldPontoonPoint = OwnerTransform.TransformPosition(LocalPontoonPoint);
if (WaterSubsystem->GetWaveHeight(WorldPontoonPoint, WaterHeight))
{
float SubmergedDepth = WaterHeight - WorldPontoonPoint.Z;
if (SubmergedDepth > 0)
{
// 计算浮力:力的大小与淹没深度成正比
// F = (重力 * 淹没深度 * 浮力系数)
float ForceScalar = -GravityZ * SubmergedDepth * BuoyancyForceMagnitude;
FVector BuoyancyForce = FVector(0, 0, ForceScalar);
// 在浮筒点的位置施加向上的力
OwningPrimitiveComponent->AddForceAtLocation(BuoyancyForce, WorldPontoonPoint);
// 调试绘制
if (bDrawDebugPoints)
{
DrawDebugSphere(GetWorld(), WorldPontoonPoint, 10.f, 8, FColor::Blue, false, -1.f, 0, 1.f);
}
}
else
{
// 调试绘制
if (bDrawDebugPoints)
{
DrawDebugSphere(GetWorld(), WorldPontoonPoint, 10.f, 8, FColor::Red, false, -1.f, 0, 1.f);
}
}
}
}
// 应用阻尼
FVector CurrentVelocity = OwningPrimitiveComponent->GetPhysicsLinearVelocity();
FVector DampingForce = -CurrentVelocity * LinearDamping * OwningPrimitiveComponent->GetMass();
OwningPrimitiveComponent->AddForce(DampingForce);
FVector CurrentAngularVelocity = OwningPrimitiveComponent->GetPhysicsAngularVelocityInDegrees();
FVector DampingTorque = -CurrentAngularVelocity * AngularDamping * OwningPrimitiveComponent->GetMass();
OwningPrimitiveComponent->AddTorqueInDegrees(DampingTorque);
}在Custom节点包含usf文件
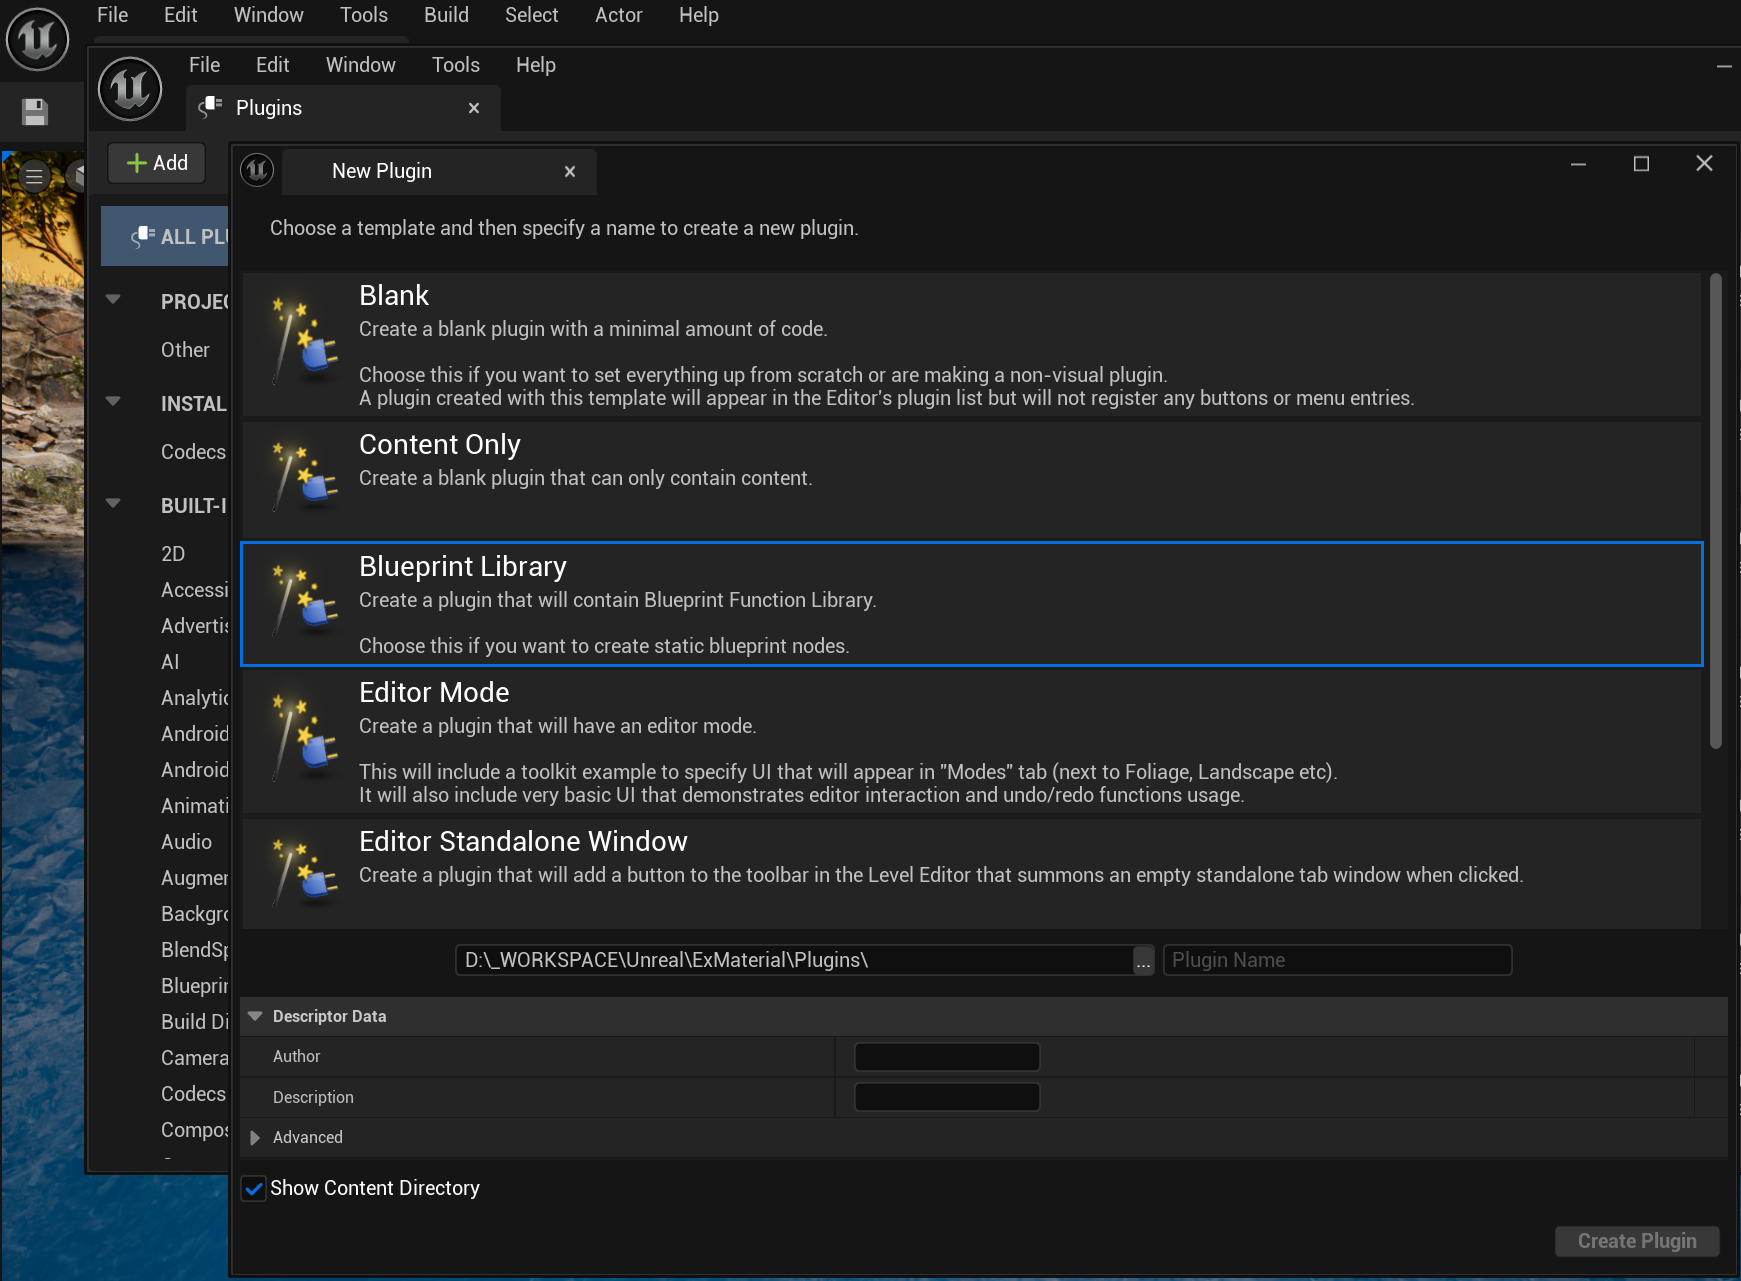
Edit->Plugins->Add->Blueprint Library,输入一个名称例如ShaderPathPlugin并点击创建
用VS或Rider打开项目,在Plugins/ShaderPathLibrary/Source/ShaderPathLibrary/Private/ShaderPathLibrary.cpp中,修改对应代码:
// ...
void FShaderPathLibraryModule::StartupModule()
{
	// This code will execute after your module is loaded into memory; the exact timing is specified in the .uplugin file per-module
	// This code will execute after your module is loaded into memory; the exact timing is specified in the .uplugin file per.module
	FString ShaderDir = FPaths::Combine(FPaths::ProjectDir(), TEXT("/Shaders"));
	AddShaderSourceDirectoryMapping("/Project/Shaders", ShaderDir);
}
// ...
在Plugins/ShaderPathLibrary/Source/ShaderPathLibrary/ShaderPathLibrary.Build.cs中,修改对应代码:
		// ...
		PrivateDependencyModuleNames.AddRange(
			new string[]
			{
				"CoreUObject",
				"Engine",
				"Slate",
				"SlateCore",
				"RenderCore",	// 加入这个
				// ... add private dependencies that you statically link with here ...
			}
			);
// ...重新编译项目,然后在工程目录下创建Shaders文件夹,里面就可以放自定义的着色器文件了,例如GerstnerWave.usf:
// GerstnerWave.usf
#pragma once

// 结构体: 波浪参数
struct FGerstnerWave
{
	float Wavelength;
	float Amplitude;
	float Steepness;
	float2 Direction;
};
// 构造结构体
// 参数打包方式为:
//WaveN_ParamsA: (Wavelength, Amplitude, Steepness)
//WaveN_ParamsB: (Direction.X, Direction.Y, 0.0)
FGerstnerWave MakeGerstnerWave(float3 paramsA, float3 paramsB)
{
	FGerstnerWave wave;
	wave.Wavelength = paramsA.x;
	wave.Amplitude  = paramsA.y;
	wave.Steepness  = paramsA.z;
	wave.Direction  = paramsB.xy;
	return wave;
}

// 函数: 处理单个波的计算
// 它返回一个 float4,其中 xyz 是位移,w 是法线的Z分量贡献值
void CalculateSingleWave(FGerstnerWave wave, float3 worldPos, float time, inout float3 totalDisplacement, inout float3 normalSum)
{
	// 如果振幅为0,则该波无效,直接返回
	if (wave.Amplitude == 0.f)
	{
		return;
	}

	float w = (2.0f * 3.14159f) / wave.Wavelength;
	float phi = sqrt(980.0f * w);
	float Q = wave.Steepness / (w * wave.Amplitude);

	// 钳制Q值,防止打结
	Q = min(Q, 1.0 / (w * wave.Amplitude));

	float dot_val = dot(wave.Direction, worldPos.xy);
	float arg = dot_val * w - phi * time;

	float cos_val = cos(arg);
	float sin_val = sin(arg);

	// 累加位移
	totalDisplacement.x += Q * wave.Amplitude * wave.Direction.x * cos_val;
	totalDisplacement.y += Q * wave.Amplitude * wave.Direction.y * cos_val;
	totalDisplacement.z += wave.Amplitude * sin_val;

	// 累加法线分量
	normalSum.x += wave.Direction.x * w * wave.Amplitude * cos_val;
	normalSum.y += wave.Direction.y * w * wave.Amplitude * cos_val;
	normalSum.z += Q * w * wave.Amplitude * sin_val;
}